Physics Engine in Odin from Scratch, Part VII
15th November 2026 • 20 min read
At this point, our physics simulation looks like the ones in many games from the early 2000s. We have a couple of boxes that can collide with each other, they can fall under the influence of gravity, but they never rotate. In this part we're going to fix that. At the end, all dynamic objects in our scene will be able to rotate naturally, and when we push a box to the edge of the one below, at a certain point the box will fall over the edge, as you'd expect.
As you can see, the simulation looks so much more convincing when torque is involved. But before we write all the necessary code to get to that point, let's briefly explain what a torque is and why most games, now more than two decades old, didn't have rotations in their physics engines.
Simulating rotation is more complicated than simulating linear motion. It makes the simulation more computationally expensive, and getting it stable, especially for objects resting on each other, was a hard problem for a long time. Together with limited hardware and the cost of writing such a system, that's why many older games didn't simulate angular motion physically, or did so only in a limited way.
Middleware such as Havok, and later PhysX, changed this by letting developers license a stable solver instead of writing their own. Version 1.0 of the Havok SDK was unveiled at the Game Developers Conference in 2000. PhysX 1.0 was released in 2005 as the AGEIA PhysX SDK. It grew out of NovodeX, which AGEIA had acquired in 2004. In 2008 AGEIA was aquired by Nvidia.
And what is torque exactly? Torque is the rotational counterpart of linear force. We already push and pull objects in our scene by integrating linear forces, and torque can be thought of as a twist applied to an object around a chosen axis. To get the result you saw in the video, we need to combine the two.
If you read the previous paragraph carefully, you'll catch the gist of the problem. We have to find the axis to twist an object around, and I'm sure you already guessed this has something to do with the exact spot on the surface our cursor hovers over when an object is pushed or pulled. That leads us back to our implementation of raycasting.
Currently, our Ray struct is missing the contact point at which a ray intercepts an object. It's surprisingly easy to add, since it's nothing more than the origin of the ray plus its direction times tMin.
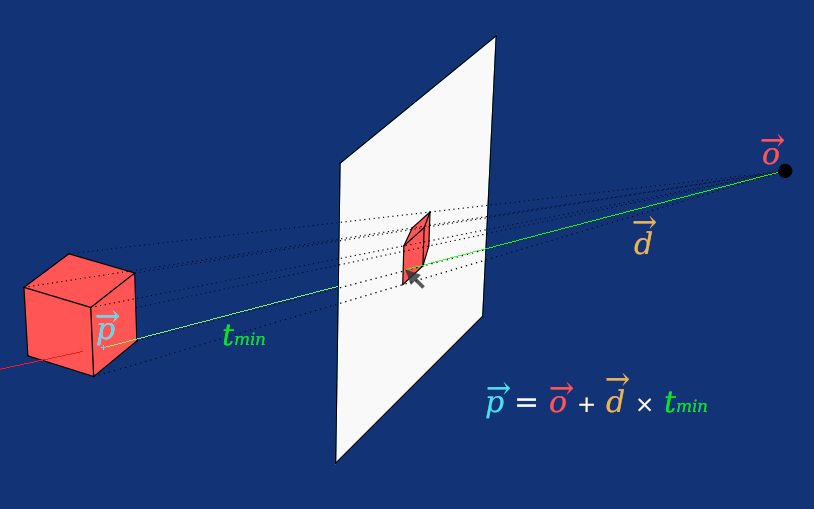
This requires adding just two lines of code, let's add them now. Open raycasting.odin and add contactPoint to our Ray struct.
Ray :: struct {
    hit: bool,
    model: ^Model,
    contactPoint: Vector3,
    direction: Vector3
}
And at the bottom of the CastRayFromWorldPosition procedure, when returning a ray, assign the contact point as we just explained.
if hit && tMin < closestDist {
    closestDist = tMin
    ray.hit = true
    ray.direction = direction
    ray.contactPoint = origin + direction * tMin
    ray.model = &model
}
That's all we need to change in the raycasting.odin file today. Now let's explain how we use this to calculate torque and eventually rotate our object. We now have a contact point on the surface of an object, the direction of the push, and the center of mass of the object. Technically, the center of mass could be somewhere else, but treating the position of our object, which for our boxes is the geometric center, as the center of mass is good enough for our simulation.
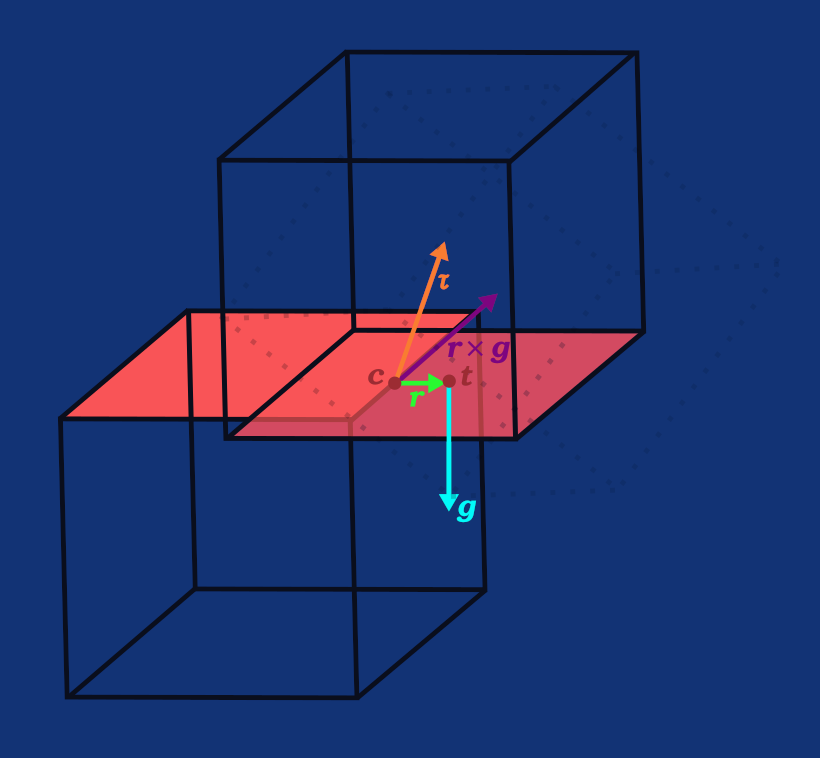
To find torque, multiply how hard you push perpendicular to a lever by how far from the pivot you push, or more formally:
where θ is the angle between the lever arm and the force:
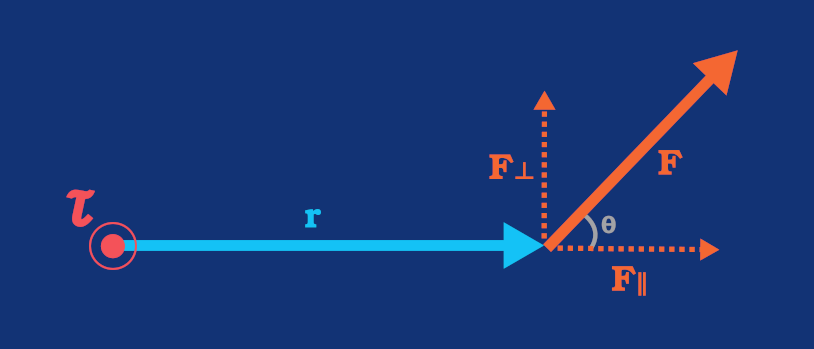
The cross product also gives us the axis we were looking for: the torque vector points along the axis of rotation, and its length is the magnitude of the twist.
Let's use this to update our AddForceAtPoint procedure in the physics.odin file, but before that, we need to extend our RigidBody struct with new fields, torque and angularVelocity, which are analogous to force and velocity. While we're at it, let's also add mass and massInverse, because we're going to need them soon.
RigidBody :: struct {
    force: Vector3,
    velocity: Vector3,
    torque: Vector3,
    angularVelocity: Vector3,
    isStatic: bool,
    bounciness: f32,
    friction: f32,
    mass: f32,
    massInverse: f32
}
Before we forget, let's quickly hop over to the model.odin file and assign values to mass and massInverse in the AddRigidbody procedure.
AddRigidbody :: proc(model: ^Model, isStatic: bool = false, bounciness: f32 = 1.0, friction: f32 = 0.5, mass: f32 = 1.0) {
    model.rigidBody = RigidBody{
        mass = mass,
        massInverse = 1.0 / mass,
        bounciness = bounciness,
        friction = friction,
        isStatic = isStatic
    }
}
Back in physics.odin, let's extend the AddForceAtPoint procedure.
AddForceAtPoint :: proc(model: ^Model, force: Vector3, contactPoint: Vector3) {
    rb, has_rb := &model.rigidBody.(RigidBody)
    if !has_rb do return

    rb.force += force

    r := contactPoint - model.translation
    torque := Vector3CrossProduct(r, force)
    rb.torque += torque
}
We added a new parameter, contactPoint, which comes from Ray. We subtract the model's position, which we treat as the center of mass, from this world position to get the r vector. The torque is then simply the cross product of the r vector and the force vector.
Now that we have not just force but also torque applied to our rigid body, we need to integrate it. We already have a procedure for integrating linear force, so let's add a new one for integrating torque.
IntegrateTorque :: proc(model: ^Model, deltaTime: f32) {
    rb := &model.rigidBody.(RigidBody)
    rb.angularVelocity += rb.torque * rb.massInverse * deltaTime
    rb.torque = {}
    rb.angularVelocity *= ANGULAR_DRAG

    length := Vector3Length(rb.angularVelocity)
    if length < MIN_ANGULAR_VELOCITY do return

    axis := rb.angularVelocity / length
    angle := length * deltaTime
    delta := MakeRotationMatrixAxisAngle(axis, angle)
    model.rotationMatrix = Mat4Mul(delta, model.rotationMatrix)
}
The procedure uses a new constant, ANGULAR_DRAG, which we define in constants.odin, so we can fine-tune it independently of the linear drag. I tested a few values, and 0.98 for linear and 0.92 for angular drag seem fine. Let's also add MIN_ANGULAR_VELOCITY; I'll explain why in a moment.
ANGULAR_DRAG :: f32(0.92)
MIN_ANGULAR_VELOCITY :: 1e-6
Before we move on, let's go over the IntegrateTorque procedure. Angular velocity is a vector whose direction is the rotation axis and whose length is the speed in radians per second. Strictly, we should use an inverse inertia tensor, but using a single scalar, the inverse mass, in its place is fine for now.
The torque field on the rigid body is an accumulator, analogous to force, so we clear it after use. Otherwise it would be applied again in the next frame.
With rb.angularVelocity *= ANGULAR_DRAG we fake friction. Without it, a single hit would make an object spin forever. Likewise, in the IntegrateLinearForce procedure, we do rb.velocity *= LINEAR_DRAG to prevent objects from moving forever.
length is the rotation speed. If it's zero, the division below would produce NaNs that spread everywhere. Drag keeps pushing the velocity toward zero, so the length can become zero. To guard against this, we return early when it's less than MIN_ANGULAR_VELOCITY.
Dividing by the length gives a unit axis, and speed times deltaTime gives the angle the object should rotate by in this frame.
Finally, we build a small rotation matrix for this frame and multiply it with the current orientation. As you already know, order matters in matrix multiplication. With our convention, delta times current rotates around world axes, which is what angular velocity is expressed in. Reversing the order would spin the model around its own local axes.
The first of the last two changes we need to make this work is calling IntegrateTorque in the ApplyPhysics procedure.
ApplyPhysics :: proc(models: []Model, deltaTime: f32) {
    for &model in models {
        rb, has_rb := model.rigidBody.?
        if !has_rb || rb.isStatic do continue

        ApplyGravity(&model, models, deltaTime)
        IntegrateLinearForce(&model, deltaTime)
        IntegrateTorque(&model, deltaTime)
    }
}
And the second is in inputs.odin, where HandleInputs adds force at a point. We now have to pass ray.contactPoint to the updated AddForceAtPoint procedure.
AddForceAtPoint(ray.model, ray.direction * pushForce, ray.contactPoint)
If you compile and run the simulation (odin run . -o:speed) and push boxes around, you should see angular motion as in the video:
We have a problem now: gravity pulls objects down, but they stay rotated. When objects fall, they should eventually rest flat on the face closest to the ground. To solve this, we have to overhaul our ApplyGravity procedure so it also stabilizes objects and tips them over edges naturally, as you can see with the smallest box in the video at the beginning of this post.
For that, we first need to implement three new procedures that ApplyGravity will call: ApplyStabilization, GetOverhang, and ApplyTipping. ApplyStabilization aligns an object with the surface below it, GetOverhang tells us how far an object sticks out past the edge of that surface, and ApplyTipping makes it fall over the edge. Let's start with the first one.
ApplyStabilization :: proc(model: ^Model, normal: Vector3) {
    closestUp  := FindClosestUpAxis(model.rotationMatrix, normal)
    correction := Vector3CrossProduct(closestUp, normal)
    rb := &model.rigidBody.(RigidBody)
    rb.torque += correction * rb.mass * STABILIZATION_STRENGTH

    FindClosestUpAxis :: proc(rotationMatrix: Matrix4x4, referenceUp: Vector3) -> Vector3 {
        axes := GetAxesFromRotationMatrix(rotationMatrix)

        closestAxis := axes[0]
        closestDot := abs(Vector3DotProduct(axes[0], referenceUp))

        for i in 1..<3 {
            d := abs(Vector3DotProduct(axes[i], referenceUp))
            if d > closestDot {
                closestDot  = d
                closestAxis = axes[i]
            }
        }

        if Vector3DotProduct(closestAxis, referenceUp) < 0 {
            closestAxis = -closestAxis
        }

        return closestAxis
    }
}
As you can see, ApplyStabilization has an inner procedure, FindClosestUpAxis, that does the heavy lifting. To find the closest axis, it first gets all three rotation axes using our GetAxesFromRotationMatrix, passing in the rotation matrix of the model. Then it iterates over them and returns the one with the largest absolute dot product with the normal, which we pass as referenceUp. If that axis points away from the normal, it gets flipped. This effectively finds out which face the box should land on.
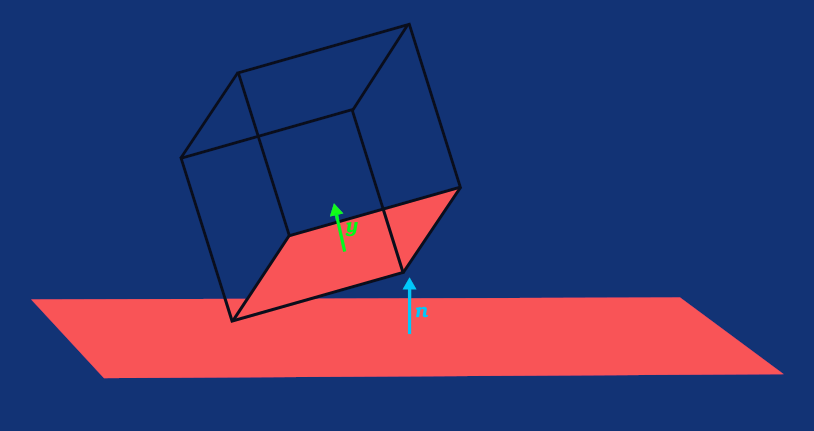
The cross product between the closestUp axis and the surface normal gives us the torque to apply to the model's rigid body in order to align the box with the surface. The scalar we multiply correction by affects how quickly the box is stabilized. Since ApplyStabilization is called every frame, correction * rb.mass * STABILIZATION_STRENGTH is the torque added in each frame. Let's define the constant in constants.odin. I found that 220 looks quite accurate, but I encourage you to play with the value after you finish this implementation, to see how it affects the simulation. Try 50 and then 500.
STABILIZATION_STRENGTH :: 220
The next piece of the puzzle is the GetOverhang procedure.
GetOverhang :: proc(model: ^Model, other: Model) -> Vector2 {
    otherAxes := GetAxesFromRotationMatrix(other.rotationMatrix)
    center := model.translation - other.translation
    projX := abs(Vector3DotProduct(center, otherAxes[0]))
    projZ := abs(Vector3DotProduct(center, otherAxes[2]))
    halfX := other.collider.x * other.scale
    halfZ := other.collider.z * other.scale
    return { projX - halfX, projZ - halfZ }
}
GetOverhang returns how far the model's center sits past the edge of the footprint of other model, per axis. It projects the offset between the two centers onto the local X and Z axes of other and subtracts the half-extents of the other (collider * scale). A positive component means overhang, and a negative one means the center is still inside. The returned Vector2 holds the X overhang in its x component and the Z overhang in its y component.
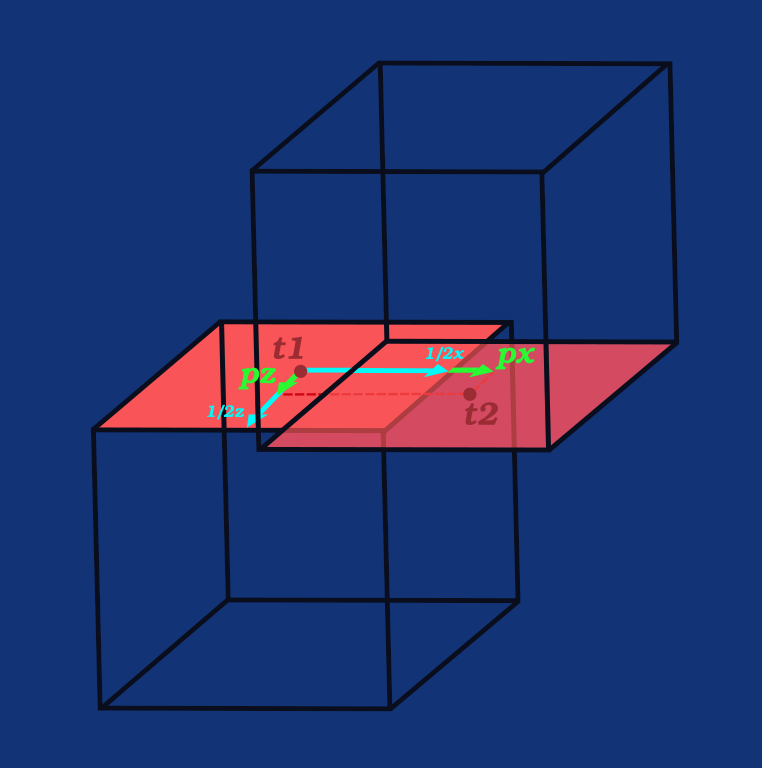
We'll use the overhang not only to determine whether an object on top should fall over the edge of the bottom one, but also inside the ApplyTipping procedure itself.
ApplyTipping :: proc(model: ^Model, contactPoint: Vector3, overhang: Vector2) {
    rContact := model.translation - contactPoint
    gravTorque := Vector3CrossProduct(rContact, GRAVITY)
    gravTorque.xz -= overhang.xy
    rb := &model.rigidBody.(RigidBody)
    rb.torque += Vector3Normalize(gravTorque) * rb.mass * TIPPING_STRENGTH
}
First, we subtract contactPoint, which is the pivot the object on top rotates around, from the model's position to get the rContact vector. Then we calculate the base gravitational torque as the cross product of this vector and the gravity vector. We subtract the x and y components of the overhang from the x and z components of this torque respectively, which shifts the torque direction according to the overhang. Finally, we normalize the result and add it to the torque accumulator of the model's rigid body, multiplying it by its mass and the TIPPING_STRENGTH constant. I found it looks quite right with the value of 14.0; let's define it in constants.odin as such:
TIPPING_STRENGTH :: 14.0
Note that both the tipping torque and stabilization torque (correction) is scaled by mass, which cancels out massInverse in IntegrateTorque, so both behaves the same for any mass.
Now that we have all three procedures implemented, let's call them from the new version of the ApplyGravity procedure.
ApplyGravity :: proc(model: ^Model, models: []Model, deltaTime: f32) {
    for &other in models {
        if &other == model do continue

        model.translation.y -= GROUND_PROBE_DIST
        probe := GetCollisionResult(model, &other)
        model.translation.y += GROUND_PROBE_DIST

        if probe.hit {
            ApplyFriction(model, other)
            ApplyStabilization(model, probe.normal)

            overhang := GetOverhang(model, other)
            if overhang.x > 0 || overhang.y > 0 {
                ApplyTipping(model, probe.contactPoint, overhang)
            }

            break
        }
    }

    rb := &model.rigidBody.(RigidBody)
    rb.velocity += GRAVITY * deltaTime
}
In this new version, we iterate over all models, and if other is the same as the current model, we skip to the next iteration. Next, we replaced the original raycast we used to check whether there's another model below with a probe: we slightly move the model down, check for a collision, and then move the model back to its original position. This shift won't be visible, since the translation is applied and reverted before rendering happens. We also need to define how deep the model should probe. The probing distance should be tiny. In constants.odin, set GROUND_PROBE_DIST to 0.05 and you're good to go.
GROUND_PROBE_DIST :: 0.05
We replaced the raycast because it cast only a single ray from the center of the cube, but for tipping we need to check the space below the entire surface. With a raycast, we'd miss the bottom object whenever the top object's center is past its edge.
Another approach would be to cast four rays, each from one corner of the bottom surface, but that would be much less efficient, since for each raycast we iterate over all models. We could also implement a box cast, but it would be almost the same as what we're doing now: we'd project an imaginary box and check for collisions against it. Moving the box itself is the simplest solution here.
If the probe hits something, we call ApplyFriction as before, then ApplyStabilization with the normal from the collision. Next, we calculate the overhang using GetOverhang and if either component is greater than 0, the model's center of mass lies beyond the edge of the surface it rests on, so it should tip over, in which case we call ApplyTipping with the model, the contact point from the probe collision, and the overhang.
Once we have a hit, we don't need to check the remaining models, so we break out of the loop and apply gravity to the velocity accumulator, as in the original procedure. This brings some limitations, for example when one object rests partially on one object and partially on another. This entire project is for learning and isn't meant to be a production-ready physics engine. If you need one, I'd highly recommend Box3D by Erin Catto. Its initial release is only about five months old, and Odin already comes with bindings!
The last problem we have to solve is that our collision resolution doesn't return the contact point we need. Go to collisions.odin, import the core:math package for math.clamp, and add a contactPoint field of type Vector3 to our CollisionResult struct.
import "core:math"

CollisionResult :: struct {
    hit: bool,
    normal: Vector3,
    depth: f32,
    contactPoint: Vector3
}
Then, below ProjectRadius inside GetCollisionResult, add another inner procedure, FindClosestPoint.
FindClosestPoint :: proc(point: Vector3, center: Vector3, axes: [3]Vector3, size: Vector3) -> Vector3 {
        d := point - center
        result := center

        for i in 0..<3 {
            dist := Vector3DotProduct(d, axes[i])
            dist = math.clamp(dist, -size[i], size[i])
            result += axes[i] * dist
        }

        return result
    }
This procedure returns the point on an oriented box that is closest to a given point. It converts the point into the box's local space by projecting the center-to-point vector onto each box axis, clamps each coordinate to the half-extent of the box, then rebuilds the world-space position from the clamped values.
Inside GetCollisionResult, use it to find the point on each box closest to the other box's center, and assign their average to contactPoint to get an approximate contact point.
GetCollisionResult :: proc(a, b: ^Model) -> CollisionResult {
    // The rest of the procedure remains unchanged

    cA := FindClosestPoint(b.translation, a.translation, axesA, a.collider)
    cB := FindClosestPoint(a.translation, b.translation, axesB, b.collider)

    return CollisionResult {
        hit = true,
        normal = -minNormal if Vector3DotProduct(direction, minNormal) < 0 else minNormal,
        depth = minDepth,
        contactPoint = (cA + cB) * 0.5
    }

    // Inner procedures ProjectRadius and FindClosestPoint
}
If you now compile and run the project (odin run . -o:speed), you should see the simulation behave just as in the video at the beginning of this part. If something doesn't work as expected, you can always refer to the GitHub repository with the complete code after each part.
In the next part, we're going to add another type of collider, a sphere collider, so we'll have not just sliding and falling boxes, but also rolling balls. This will bring some interesting problems we'll have to solve.
Enjoyed this article? Support my work ❤️
All content on this blog, which I've already put hundreds of hours into, is and always will be free.
No ads. No paywalls. No tricks.
I've personally paid for a lot of educational content, but I strongly believe knowledge should be accessible to everyone.
I also pay to keep this blog up and running, and if you like what I do here, if it has helped you, and you would like to support me, you can

Even a small contribution, the price of a coffee, is very much appreciated.
Other Parts of This Series
- Physics Engine in Odin from Scratch, Part I
- Physics Engine in Odin from Scratch, Part II
- Physics Engine in Odin from Scratch, Part III
- Physics Engine in Odin from Scratch, Part IV
- Physics Engine in Odin from Scratch, Part V
- Physics Engine in Odin from Scratch, Part VI
- Physics Engine in Odin from Scratch, Part VII


