Physics Engine in Odin from Scratch, Part V
30th August 2026 • 19 min read
In the fifth part of our tutorial series, where we build a physics engine from scratch, we're going to implement raycasting to select, pull, push, freeze, and unfreeze objects using the mouse. From now on, it will be even more fun as we get this ability to interact with objects in the scene.
As you can see in the video, we won't have angular motion yet. We'll learn about torque, rotations, and all that good stuff in Part VII. Now, let's talk about what raycasting is and how it works. It's actually a simple concept. In general, raycasting consists of defining a ray in space by specifying two points or a point and a direction. A ray has an origin and a direction, and extends infinitely in that direction. A line, on the other hand, extends infinitely in both directions. Once we have this ray, we ask whether it intersects with an object or multiple objects.
Additionally, we might want to know the point where the ray enters the object. We don't need this point now, but in Part VII we'll use it to apply torque properly.
In most FPS games, raycasting is typically used for shooting, and if the game doesn't aim for high realism (pun intended), a straight ray from the center of the screen where your crosshair sits is enough to represent a bullet trajectory. If this ray intersects an enemy (or an enemy's hitbox, to be precise), the enemy is hit, and their health points are reduced. In realistic games and simulations, a proper ballistic curve is calculated, and even the strength and direction of the wind, air pressure, and humidity might be considered; also, the time it would take a bullet to reach its target is taken into account. While the algorithms are far more complex, the general idea is similar to raycasting. I had my fair share of these things when working on military simulators some years ago.
In our case, we're going to cast a ray from a point on screen where we place our cursor when a mouse button is pressed. For that, we'd need to convert 2D screen-space coordinates to a 3D world position. Since our software renderer supports two types of projection, perspective and orthographic, we'll have to take care of both cases.
In fact, we'll split this task into two procedures, GetRayOrigin and GetRayDirection. Once we have this, we'll iterate over all models and check if we have a hit; if so, a Ray struct we'll define with a Boolean variablehit would have this variable set to true, and we also include a reference to a model that has been hit, and a direction of the ray to push or pull it along. An instance of the Ray struct will be returned at the end of the CastRay procedure, even when there's no hit (withhit set to false).
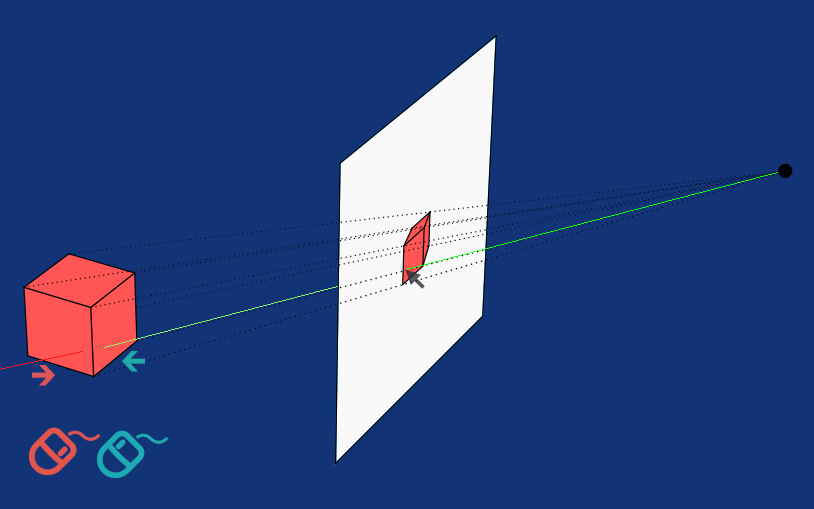
That's all the theory we need for now; I'll explain the rest while we implement our raycasting logic. Without further ado, add a new file to the project and name it raycasting.odin. After the usual package definition and import of code:math package we're going to need for the tan_f32 procedure, define the above-mentioned Ray struct.
package main

import "core:math"

Ray :: struct {
    hit: bool,
    model: ^Model,
    direction: Vector3
}
Now, switch over to camera.odin. We need to extend our Cameraand its factory procedure, so we'll be able to find the origin and direction of a ray from the screen-space position; in other words, we need to calculate and store the forward, right, and up vectors. Here's the extended Camera struct.
Camera :: struct {
    position: Vector3,
    target: Vector3,
    forward: Vector3,
    right: Vector3,
    up: Vector3
}
Our camera is static, so we only need to calculate these vectors once, in the MakeCamera procedure. The forward vector is the normalized direction the camera is facing the target. We get that direction by subtracting the camera position from the target position.
The right vector is perpendicular to the forward vector and the up direction of our world space, which is [0,1,0].
And the up vector is perpendicular to right and forward. You certainly already know that to get a vector in 3D space that is perpendicular to two other vectors, we can use a cross product, and we have a procedure for that: Vector3CrossProduct. We also need to store all these vectors in their normalized forms; they represent directions from the camera to the front, right, and up, and thus they should be unit vectors. We'll use our Vector3Normalize procedure from vectors.odin. With all of that, the updated MakeCamera procedure should look like this.
MakeCamera :: proc(position, target: Vector3) -> Camera {
    forward := Vector3Normalize(target - position)
    right := Vector3Normalize(Vector3CrossProduct(forward, WORLD_UP))

    return Camera {
        position = position,
        target = target,
        forward = forward,
        right = right,
        up = Vector3CrossProduct(right, forward)
    }
}
We don't have the WORLD_UP constant defined yet. Go to constants.odin and add the following line.
WORLD_UP :: Vector3{0, 1, 0}
Even if we use the value in one place, it's useful to define a named constant, so anyone who reads our code and looks into constants would immediately get very useful information about how our world space is oriented. Now, we can hop back to raycasting.odin and start implementing the CastRay procedure. This is the very essence of today's part.
Later, we're going to call this procedure from HandleInputs, which we have implemented in inputs.odin. The CastRay procedure takes screen coordinates, a camera, the current projection type, and a collection of all models in the scene, and, as mentioned already, returns a Ray.
With screen coordinates, we first calculate the normalized device coordinates (NDC) by dividing X and Y by the screen width and height, respectively, multiplying by 2, and subtracting 1 from the result. We then get X and Y always between -1.0 and 1.0. With [0,0] right in the center of the screen no matter the screen size and the aspect ratio, hence the name normalized device coordinates (some people call them normalized screen coordinates; I'll stick with normalized device coordinates, since it's the most commonly used term, often abbreviated as NDC).
Then we use NDC, camera, and projection type to get the origin and direction of a ray, using two other procedures we'll implement at the end of the CastRay as inner procedures. We also define the closest distance with the initial value of the maximum of 32-bit float type. The value could be any very high number (or relatively small if we'd be making a game and want to use raycasting to pick only objects within the player's reach).
CastRay :: proc(screenX, screenY: f32, camera: Camera, projType: ProjectionType, models: []Model) -> Ray {
    ndcX := (screenX / f32(SCREEN_WIDTH)) * 2.0 - 1.0
    ndcY := (screenY / f32(SCREEN_HEIGHT)) * 2.0 - 1.0

    rayOrigin := GetRayOrigin(ndcX, ndcY, camera, projType)

    ray: Ray
    ray.direction = GetRayDirection(ndcX, ndcY, camera, projType)

    closestDist := max(f32)
Now we have to loop over all models and check whether our ray intersects any of them. If that's the case, we want to set the model of the ray later returned from the procedure to be the closest one. In this loop, we need the difference between the model position and the ray direction.
for &model in models {
    center := model.translation
    delta := center - rayOrigin
We also need the axes of the model, a collection of three vectors we get with our helper procedure from matrix.odin: GetAxesFromRotationMatrix. We also need the size of its collider, which is another set of three vectors representing the shape of a box. Note that this algorithm only works with box colliders. In one of the upcoming parts, when we add sphere colliders, we'll have to revisit this implementation and adjust it to support both types of colliders.
axes := GetAxesFromRotationMatrix(model.rotationMatrix)
size := model.collider * model.scale
Now, it's similar to the collision detection, since we're actually detecting a collision between an invisible ray and a box collider. We need to loop over all three axes and perform a slab intersection test against the pair of planes associated with each axis. First, we define two parameters along the ray. To make things clearer, here's the parametric equation of a ray:
Initially, we set one parameter to 0, and the other to the maximum the f32 type can hold. We also need a Boolean variable hit, which we set to true at this point. It'll end up false if the ray doesn't intersect the model.
tMin := f32(0)
tMax := max(f32)
hit := true
Then we loop over those three axes we got from the GetAxesFromRotationMatrix procedure, and by calculating the dot products of the axis and delta (center - rayOrigin) and axis and ray direction, we get two scalars, e and f.
As you certainly know by now, dot products encode information about the angle between two vectors. For visualization, you can use one of my old web tools made with Three.js and dat-gui: Vecalc.
for i in 0..<3 {
    axis := axes[i]
    e := Vector3DotProduct(axis, delta)
    f := Vector3DotProduct(axis, ray.direction)
With these scalars, we set t1 and t2 to e plus and minus the respective component of the collider, divided by f. If t1 is greater than t2, it means the ray is pointing in the negative direction along that axis, in which case we swap the two values using a neat syntax Odin provides. We also want to skip planes that are parallel or almost parallel to the ray's direction.
if abs(f) < 1e-6 {
    if e < -size[i] || e > size[i] {
        hit = false
        break
    }
    continue
}

t1 := (e + size[i]) / f
t2 := (e - size[i]) / f

if t1 > t2 {
    t1, t2 = t2, t1
}
Finally, we set tMin to stay as is or become t1 if t1 is greater than the currenttMin. With tMax, we do the opposite. Then, if tMin is greater than tMax, the ray definitely does not intersect with the model. We set hit to false and break out of the loop over the axes.
tMin = max(tMin, t1)
tMax = min(tMax, t2)
if tMin > tMax {
hit = false
break
}
}
If you see some resemblance to SAT here, a point for you, and if you need to pause and go over the code again, slowly, line by line, to wrap your head around it, even a couple of times, it's completely normal. Drawing by hand often helps in these cases. That's why many great programmers keep pencil and paper next to their keyboard, and you can often see them scribble when you don't hear their loud mechanical keycaps. When they're just staring at the ceiling or wall, they're not slacking (fair enough, sometimes they might; it's important to take a break from time to time); they're visualizing.
Out of the loop over axes, we're still looping over models. That's where the closest distance comes into play. Because in our case we're only interested in the model that has been hit first, if we have a hit and tMin is smaller than the value of the closestDist, which always is in the first iteration of this loop, because the closest distance started at the very high value, we set closestDist to the new tMin.
We also set hit to true, and a reference to the model in the current iteration of the loop. The model will be overridden in the next iterations if we find a closer one. Out of the loop, we return the ray to the caller for further processing.
if hit && tMin < closestDist {
closestDist = tMin
ray.hit = true
ray.model = &model
}
}
return ray
Of course, checking a ray against all models isn't the most optimal way. It's not as bad as our naïve algorithm for collision detection where we check all models against every other model, which has the quadratic time complexity O(N^2). Here we're in the realm of slightly better time complexity, the linear one: O(N). We're going to optimize our simulation a bit in the final part of this series.
What remains in raycasting.odin is to implement those two procedures: GetRayOrigin and GetRayDirection. They won't be used anywhere outside the scope of the CastRay. Let's write them as inner procedures.
If we had only perspective projection, we probably wouldn't even implement the GetRayOrigin procedure; the ray's origin would always be the camera position. However, with orthographic projection, we need the NDC and aspect ratio of the screen. We get the aspect ratio by dividing screen height by screen width. Then, to get the proper ray origin, we add to the camera position the camera.right vector multiplied by the ndcX and the aspect ratio, and on top of that we add camera.up multiplied by the negative of ndcY.
GetRayOrigin :: proc(ndcX, ndcY: f32, camera: Camera, projType: ProjectionType) -> Vector3 {
    if projType == .Perspective do return camera.position

    aspect := f32(SCREEN_WIDTH) / f32(SCREEN_HEIGHT)
    return camera.position + camera.right * (ndcX * aspect) + camera.up * (-ndcY)
}
With GetRayDirection, we have the opposite situation. If we had only orthographic projection, the direction of a ray would always be the camera.forward. If you visualize a frustum of orthographic projection, which is a box, it makes perfect sense. To get the ray direction in perspective projection, we once again need NDC and aspect ratio. But this time we also need the tangent of half of the field of view (FOV is defined in constants.odin).
The proper ray direction in perspective projection is a normalized vector that we get by adding camera.forward to camera.right multiplied by ndcX, aspect ratio, and tangent of half of FOV, plus camera.up multiplied by negative ndcY and tangent of the half of FOV.
GetRayDirection :: proc(ndcX, ndcY: f32, camera: Camera, projType: ProjectionType) -> Vector3 {
    if projType == .Orthographic do return camera.forward

    aspect := f32(SCREEN_WIDTH) / f32(SCREEN_HEIGHT)
    tanHalfFov := math.tan_f32(FOV * 0.5 * DEG_TO_RAD)

    return Vector3Normalize (
        camera.forward +
        camera.right * (ndcX * aspect * tanHalfFov) +
        camera.up * (-ndcY * tanHalfFov)
    )
}
Again, you might need some time to wrap your head around this. Give yourself all the time you need; these concepts are advanced. A strong foundation in linear algebra is highly recommended for this kind of programming. It's debatable whether you need math to be a good programmer; some people claim you don't, others fiercely defend the opposite. I'd say it depends on your line of work. In many areas, a strong math foundation is a must; in others, it might be helpful from time to time. In general, learning math trains your brain in a very unique way that's beneficial for any problem-solving. In the end, it's up to you to decide how far you want to take it. The deeper you get, the more time and energy it takes, but the more benefits you reap. It's the universal rule that almost everything in life abides by.
Let's now hop over to input.odin to use raycasting for pushing, pulling, and freezing objects with the mouse in our HandleInputs procedure. For that, the procedure also needs a collection of models and a camera; the updated signature looks like this:
HandleInputs :: proc(
    model: ^Model, models: []Model,
    renderMode: ^i8, renderModesCount: i8,
    projType: ^ProjectionType,
    camera: Camera,
    deltaTime: f32
)
Now, at the very end, let's first define the amount of force we'd like to push or pull our models with. We can do it so that when left shift is pressed, a greater force is applied. We also need two Boolean variables, poke and freeze, both initially set to false.
pushForce: f32 = (rl.IsKeyDown(rl.KeyboardKey.LEFT_SHIFT) ? 360 : 180) * deltaTime
poke := false
freeze := false
Then we set these variables or eventually negate the force when the left, right, or middle mouse button is pressed. Applying negative push force means we're going to pull instead of push.
if rl.IsMouseButtonDown(rl.MouseButton.LEFT) {
    poke = true
} else if rl.IsMouseButtonDown(rl.MouseButton.RIGHT) {
    poke = true
    pushForce = -pushForce
} else if rl.IsMouseButtonPressed(rl.MouseButton.MIDDLE) {
    freeze = true
}
And finally, if either poke or freeze is set to true, in other words, if the left or right mouse button is pressed, we cast a ray. If we hit a model and poke is true, then we apply push force to that model along the direction of the ray using the ApplyForceAtPoint procedure, which we yet need to implement in physics.odin, and if freeze is true, then we flip the isStatic flag on the model's rigidbody, effectively making dynamic models static and static ones dynamic.
if poke || freeze {
ray := CastRay(f32(rl.GetMouseX()), f32(rl.GetMouseY()), camera, projType^, models)
if ray.hit {
if poke {
AddForceAtPoint(ray.model, ray.direction * pushForce)
}
else if freeze {
ray.model.rigidBody.isStatic = !ray.model.rigidBody.isStatic
}
}
}
}
And that's all in the inputs.odin file. Simple, right? The AddForceAtPoint procedure in physics.odin would be even simpler.
AddForceAtPoint :: proc(model: ^Model, force: Vector3) {
    model.rigidBody.force += force
}
You might ask why implement such a procedure. Why not apply force directly in the HandleInputs? This is preparation for later; right now it doesn't apply force at a specific point on the surface, but we'll extend this procedure when we introduce angular motion in Part VII. You certainly noticed that if you want to turn over something taller than you, like a bookshelf or a large fridge, you don't push up; you push forward, and it turns over and eventually falls when a vector pointing from its center of mass to the center of the Earth no longer goes through the base. By the end of this series, our physics simulation will handle cases like this properly.
Now we need to pass models and camera to the HandleInputs procedure in main.odin, and we're done.
HandleInputs(selectedModel, models, &renderMode, renderModesCount, &projectionType, camera, deltaTime)
If you build and run the simulation (odin run -o:speed), you should be able to push and pull those wooden boxes around or freeze and unfreeze them as shown in the video at the beginning of this post. As always, you can find the full implementation for today's and all other parts in this GitHub repository. In Part VI, we're going to talk about mass, friction, and bounciness.
Before we wrap this up, note that we don't have to limit ourselves to casting a single ray; there might be cases where you'd want to cast multiple rays in equally or randomly distributed directions around some point (think of an explosion and flying debris or shrapnel). It doesn't even have to be a ray; we can cast a curve, a box (boxcasting), or a sphere (spherecasting), to name just a few of the most common. It's beyond the scope of this series, and the algorithms are a bit more complex; however, the essence stays the same: an invisible object in the scene draws a path, collisions between this object and other objects in the scene are detected, and then the object(s) that collided are returned together with additional information for resolution by the caller.
Enjoyed this article? Support my work ❤️
All content on this blog, which I've already put hundreds of hours into, is and always will be free.
No ads. No paywalls. No tricks.
I've personally paid for a lot of educational content, but I strongly believe knowledge should be accessible to everyone.
I also pay to keep this blog up and running, and if you like what I do here, if it has helped you, and you would like to support me, you can

Even a small contribution, the price of a coffee, is very much appreciated.