Software Renderer in Odin from Scratch, Part XI
19th January 2026 • 20 min read
In the previous ten parts, we've implemented together a software renderer capable of loading a mesh from a single OBJ file and rendering it in eight different modes, from the simplest ones, which render only wireframe with backface culling either off or on, trough unlit and flat shaded modes to the most complex, where we apply textures and perform per pixel lighting calculations using the Phong shading approach.
Though we've already introduces some optimizations, such as the previously mentioned back face culling, to skip rendering of faces we shouldn't see anyway because they are pointing away from the camera, and frustum culling (IsFaceOutsideFrustum procedure in draw.odin), to skip rendering of faces that are outside the visible space, we've focused mainly on the underlying math and algorithms.
You might have noticed that as the complexity of the rendering modes increases, and particularly when you upscale the mesh or move it closer to the camera so it appears bigger due to the nature of perspective projection, the frame rate drops significantly. Unless you have a very powerful CPU, this is clearly visible to the naked eye. However, if you add the following line in main.odin, just before rl.EndDrawing():
rl.DrawFPS(10, 10)
You will see the current frame rate (or FPS = Frames Per Second) in the top left corner of the window, 10 pixels from the top-left corner. This number tells you how many times per second the entire screen is rendered, or in other words, how many times per second your hardware is capable of executing our main loop.
The fact that the frame rate drops when we upscale the model or move it closer to the camera makes perfect sense, since we perform calculations per pixel. A bigger model means bigger triangles and bigger triangles mean more pixels on the screen, and more pixels on the screen mean more per-pixel calculations.
This brings us to the concept of cold and hot code. Cold code refers to code that is usually executed only once, typically at the beginning of the program or when the program is shutting down. In our case, cold code includes initialization of a window, loading a mesh and texture, and all our factory procedures, whose names start with Make. On the other hand, hot code is code that runs over and over. In our renderer, hot code is easy to identify. It is everything that is executed inside the main loop.
// cold code
!rl.WindowShouldClose() {
    // hot code
}
// cold code
We're going to focus on the optimization of hot code. But of course, if there were a potential to optimize the initialization methods to cut down program start-up time from, let's say, 30 seconds to under one second, or even a few seconds, that's worth investing the effort in, because the user would definitely notice, but spending energy to squeeze a few milliseconds from cold code doesn't make sense. On my PC, which I built nearly six years ago with an AMD Ryzen 7 3700X CPU and 32 GB (2x16GB) 3000 MHz DDR4 RAM, our software renderer boots up within a second.
With hot code, the situation is drastically different. Even a single millisecond counts, because they add up, and especially in rendering, as you'll soon see for yourself, even a hundred nanoseconds, squeezed out of from per pixel operation, can make a huge difference. Notice the units, with cold code optimizations, we're talking about seconds, while in the case of hot code, we're dealing with milliseconds or even nanoseconds.
Profiling
There are basically two approaches you can choose when optimizing a piece of code, and they don't exclude but rather complement each other. The first approach is analytical, when you simply analyse performance based on your understanding of the implementation and the underlying technology. The more experience you have and the more you know about the technology, the easier it is to optimize the code or to write more optimized code in the first place.
We already went through this thought process a bit, a couple of paragraphs above, when I pointed out that more pixels on the screen means more per-pixel calculations. It also means more pixels need to be drawn on the screen, which might seem too obvious to mention, but bear with me, there is a reason why I'm bringing it up.
The second approach is called profiling and involves using tools that help you identify performance bottlenecks. These tools are called profilers, and one that is designed specifically for Odin is called Spall.
I'm not going to copy and paste code from the documentation to show how to enable automatic profiling of every procedure; it's already demonstrated over there, and I believe you'd be able to do this on your own if you want to. Just make sure to run our renderer for only a second or two to avoid sampling too much and producing a profiling file (.spall) that would be too large, since you won't be able to open such a large file in Spall-web web-based profiler.
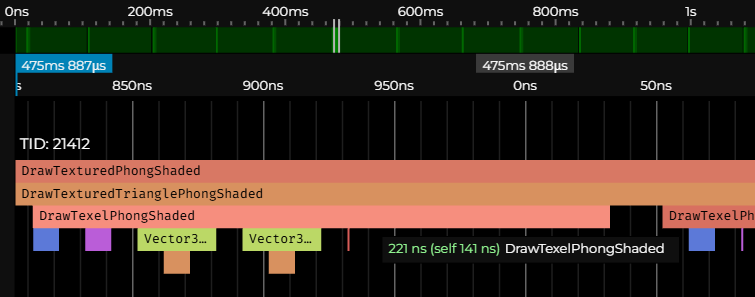
Even though it might seem that DrawTexelPhongShaded runs fast, when triangles that make our mesh fill the entire screen, which is 800x600 pixels, this procedure runs 800 x 600 = 480.000 times. Multiply this by 221 ns, and you get 106.080.000 ns or ~106 ms, which means on my computer, 1 second is not enough time to run this procedure even 10 times, or speaking in FPS. That's less than 10 FPS.
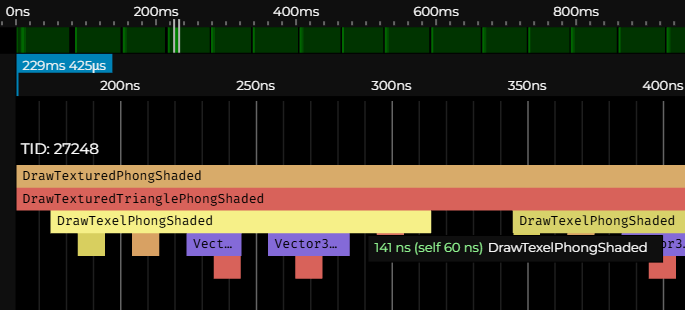
There is some overhead of profiling, but even without it, I'm getting around 15 to 17 FPS. In simpler flat shaded rendering mode with no texture mapping, I'm barely holding 20 FPS, and the same applies to the unlit rendering mode.
Let's now cut straight to the chase, the main issue here are per pixel API calls, since we call rl.DrawPixel for every single pixel. In case you're interested, here you can see the implementation of raylib's DrawPixel procedure. The library itself is written in C; the API we are using from Odin consists only of bindings.
Drawing Pixels With a Buffer
To significantly improve performance, instead of calling rl.DrawPixel per pixel, we can pass a buffer to our rendering pipeline. The buffer could essentially be just an array with the same size as our screen. We store pixels in this buffer just as if we were drawing them directly on the screen, but we won't actually draw anything until the end of each frame, when we take this buffer and draw everything at once.
But since we're using raylib, we can utilize its Image and Texture structures, as my friend suggested when I was originally developing the software renderer this series is based on. We're going to pass an Image reference to our pipeline. At the end of each frame, we update a Texture with pixels we store in this image, and then we draw the texture to the screen using raylib's DrawTexture procedure.
Let's now open the draw.odin file, locate our DrawPixel procedure, and add to its signature a new parameter of type ^rl.Image. The updated signature will look like this:
DrawPixel :: proc(
    x, y: f32,
    p1, p2, p3: ^Vector3,
    color: rl.Color,
    zBuffer: ^ZBuffer,
    image: ^rl.Image
) {
Inside the scope of this procedure, replace the call to rl.DrawPixel with rl.ImageDrawPixel, while passing in the image reference.
rl.ImageDrawPixel(image, ix, iy, color)
Our DrawPixel function now draws into an image, our buffer, instead of drawing directly to the screen, but this change broke all calls to DrawPixel. However, leave them broken for now and rather find another occurrence of rl.DrawPixel. The next one is in DrawLine, let's do an analogical change in its signature and body:
DrawLine :: proc(a, b: Vector2, color: rl.Color, image: ^rl.Image) {
    // ...
    rl.ImageDrawPixel(image, i32(x), i32(y), color)
    // ...
}
There are three more occurrences, one in the DrawTexelFlatShaded, one in DrawPixelPhongShaded, and yet another one in the DrawTexelPhongShaded procedure. Let's change them as well:
DrawTexelFlatShaded :: proc(
    x, y: f32,
    p1, p2, p3: ^Vector3,
    uv1, uv2, uv3: ^Vector2,
    texture: Texture,
    intensity: f32,
    zBuffer: ^ZBuffer,
    image: ^rl.Image
) {
    // ...
    rl.ImageDrawPixel(image, ix, iy, shadedTex)
    // ...
}
DrawPixelPhongShaded :: proc(
    x, y: f32,
    v1, v2, v3: ^Vector3,
    n1, n2, n3: ^Vector3,
    p1, p2, p3: ^Vector3,
    color: rl.Color,
    light: Light,
    zBuffer: ^ZBuffer,
    image: ^rl.Image,
    ambient:f32 = 0.2
) {
    // ...
    rl.ImageDrawPixel(image, ix, iy, shadedColor)
    // ...
}
DrawTexelPhongShaded :: proc(
    x, y: f32,
    v1, v2, v3: ^Vector3,
    n1, n2, n3: ^Vector3,
    p1, p2, p3: ^Vector3,
    uv1, uv2, uv3: ^Vector2,
    texture: Texture,
    light: Light,
    zBuffer: ^ZBuffer,
    image: ^rl.Image,
    ambient:f32 = 0.2
) {
    // ...
    rl.ImageDrawPixel(image, ix, iy, shadedTex)
    // ...
}
This obviously breaks even more calls, but we now have the last layer of our rendering pipeline updated. Let's move one level up and fix those broken calls by making similar changes in the DrawWireframe, DrawFilledTriangle, DrawTexturedTriangleFlatShaded, DrawTrianglePhongShaded, and DrawTexturedTrianglePhongShaded procedures.
I believe you'd be able to make these changes without further guidance at this point, but for the sake of completeness, here are all the necessary changes:
DrawWireframe :: proc(
    vertices: []Vector3,
    triangles: []Triangle,
    projMat: Matrix4x4,
    color: rl.Color,
    cullBackFace: bool,
    image: ^rl.Image,
) {
    // ...
    DrawLine(p1.xy, p2.xy, color, image)
    DrawLine(p2.xy, p3.xy, color, image)
    DrawLine(p3.xy, p1.xy, color, image)
    // ...
}
DrawFilledTriangle :: proc(
    p1, p2, p3: ^Vector3,
    color: rl.Color,
    zBuffer: ^ZBuffer,
    image: ^rl.Image
) {
    // ...
    // Draw a flat-bottom triangle
    // ...
    DrawPixel(x, y, p1, p2, p3, color, zBuffer, image)
    // ...
    // Draw a flat-top triangle
    // ...
    DrawPixel(x, y, p1, p2, p3, color, zBuffer, image)
    // ...
}
DrawTexturedTriangleFlatShaded :: proc(
    p1, p2, p3: ^Vector3,
    uv1, uv2, uv3: ^Vector2,
    texture: Texture,
    intensity: f32,
    zBuffer: ^ZBuffer,
    image: ^rl.Image
) {
    // ...
    // Draw a flat-bottom triangle
    // ...
    DrawTexelFlatShaded(
        x, y,
        p1, p2, p3,
        uv1, uv2, uv3,
        texture, intensity, zBuffer, image
    )
    // ...
    // Draw a flat-top triangle
    // ...
    DrawTexelFlatShaded(
        x, y,
        p1, p2, p3,
        uv1, uv2, uv3,
        texture, intensity, zBuffer, image
    )
    // ...
}
DrawTrianglePhongShaded :: proc(
    v1, v2, v3: ^Vector3,
    p1, p2, p3: ^Vector3,
    n1, n2, n3: ^Vector3,
    color: rl.Color,
    light: Light,
    zBuffer: ^ZBuffer,
    image: ^rl.Image,
    ambient:f32 = 0.2
) {
    // ...
    // Draw a flat-bottom triangle
    // ...
    DrawPixelPhongShaded(
        x, y,
        v1, v2, v3,
        n1, n2, n3,
        p1, p2, p3,
        color, light, zBuffer, image, ambient
    )
    // ...
    // Draw a flat-top triangle
    // ...
    DrawPixelPhongShaded(
        x, y,
        v1, v2, v3,
        n1, n2, n3,
        p1, p2, p3,
        color, light, zBuffer, image, ambient
    )
    // ...
}
DrawTexturedTrianglePhongShaded :: proc(
    v1, v2, v3: ^Vector3,
    p1, p2, p3: ^Vector3,
    uv1, uv2, uv3: ^Vector2,
    n1, n2, n3: ^Vector3,
    texture: Texture,
    light: Light,
    zBuffer: ^ZBuffer,
    image: ^rl.Image,
    ambient:f32 = 0.2
) {
    // ...
    // Draw a flat-bottom triangle
    // ...
    DrawTexelPhongShaded(
        x, y,
        v1, v2, v3,
        n1, n2, n3,
        p1, p2, p3,
        uv1, uv2, uv3,
        texture, light, zBuffer, image, ambient
    )
    // ...
    // Draw a flat-top triangle
    // ...
    DrawTexelPhongShaded(
        x, y,
        v1, v2, v3,
        n1, n2, n3,
        p1, p2, p3,
        uv1, uv2, uv3,
        texture, light, zBuffer, image, ambient
    )
    // ...
}
Finally, we need to fix the last layer of procedures, the ones that we call from our main loop, before moving from draw.odin to main.odin to make the last changes over there. You probably noticed that we're going through our rendering pipeline from end to start, or from bottom up, if you prefer. This is a good approach for such an invasive change, since any decent IDE shows the incorrect procedure calls, usually with squiggly underlines, which helps us to proceed methodically, layer by layer, until there are no errors.
DrawUnlit :: proc(
    vertices: []Vector3,
    triangles: []Triangle,
    projMat: Matrix4x4,
    color: rl.Color,
    zBuffer: ^ZBuffer,
    image: ^rl.Image
) {
    // ...
    DrawFilledTriangle(&p1, &p2, &p3, color, zBuffer, image)
    // ...
}
DrawFlatShaded :: proc(
    vertices: []Vector3,
    triangles: []Triangle,
    projMat: Matrix4x4,
    light: Light,
    color: rl.Color,
    zBuffer: ^ZBuffer,
    image: ^rl.Image,
    ambient:f32 = 0.2
) {
    // ...
    DrawFilledTriangle(&p1, &p2, &p3, shadedColor, zBuffer, image)
    // ...
}
DrawTexturedUnlit :: proc(
    vertices: []Vector3,
    triangles: []Triangle,
    uvs: []Vector2,
    texture: Texture,
    zBuffer: ^ZBuffer,
    projMat: Matrix4x4,
    image: ^rl.Image
) {
    // ...
    DrawTexturedTriangleFlatShaded(
        &p1, &p2, &p3,
        &uv1, &uv2, &uv3,
        texture,
        1.0, // Unlit
        zBuffer,
        image
    )
    // ...
}
DrawTexturedFlatShaded :: proc(
    vertices: []Vector3,
    triangles: []Triangle,
    uvs: []Vector2,
    light: Light,
    texture: Texture,
    zBuffer: ^ZBuffer,
    projMat: Matrix4x4,
    image: ^rl.Image,
    ambient:f32 = 0.2
) {
    // ...
    DrawTexturedTriangleFlatShaded(
        &p1, &p2, &p3,
        &uv1, &uv2, &uv3,
        texture, intensity, zBuffer, image
    )
    // ...
}
DrawPhongShaded :: proc(
    vertices: []Vector3,
    triangles: []Triangle,
    normals: []Vector3,
    light: Light,
    color: rl.Color,
    zBuffer: ^ZBuffer,
    projMat: Matrix4x4,
    image: ^rl.Image,
    ambient:f32 = 0.1
) {
    // ...
    DrawTrianglePhongShaded(
        &v1, &v2, &v3,
        &p1, &p2, &p3,
        &n1, &n2, &n3,
        color, light, zBuffer, image, ambient
    )
    // ...
}
DrawTexturedPhongShaded :: proc(
    vertices: []Vector3,
    triangles: []Triangle,
    uvs: []Vector2,
    normals: []Vector3,
    light: Light,
    texture: Texture,
    zBuffer: ^ZBuffer,
    projMat: Matrix4x4,
    image: ^rl.Image,
    ambient:f32 = 0.2
) {
    // ...
    DrawTexturedTrianglePhongShaded(
        &v1, &v2, &v3,
        &p1, &p2, &p3,
        &uv1, &uv2, &uv3,
        &n1, &n2, &n3,
        texture, light, zBuffer, image, ambient
    )
    // ...
}
Now, in main.odin, we need to create an image and a texture. For initialization, we can use raylib’s GenImageColor and LoadTextureFromImage, passing in the generated image. Put these two lines somewhere before our main loop that starts with for !rl.WindowShouldClose().
renderImage := rl.GenImageColor(SCREEN_WIDTH, SCREEN_HEIGHT, rl.LIGHTGRAY)
renderTexture := rl.LoadTextureFromImage(renderImage)
Next, we need to fix calls of our 8 main rendering pipeline procedures to which we just added that new image parameter, by passing in the &renderImage:
switch renderMode {
    case 0: DrawWireframe(mesh.transformedVertices, mesh.triangles, projectionMatrix, rl.GREEN, false, &renderImage)
    case 1: DrawWireframe(mesh.transformedVertices, mesh.triangles, projectionMatrix, rl.GREEN, true, &renderImage)
    case 2: DrawUnlit(mesh.transformedVertices, mesh.triangles, projectionMatrix, rl.WHITE, zBuffer, &renderImage)
    case 3: DrawFlatShaded(mesh.transformedVertices, mesh.triangles, projectionMatrix, light, rl.WHITE, zBuffer, &renderImage)
    case 4: DrawPhongShaded(mesh.transformedVertices, mesh.triangles, mesh.transformedNormals, light, rl.WHITE, zBuffer, projectionMatrix, &renderImage)
    case 5: DrawTexturedUnlit(mesh.transformedVertices, mesh.triangles, mesh.uvs, texture, zBuffer, projectionMatrix, &renderImage)
    case 6: DrawTexturedFlatShaded(mesh.transformedVertices, mesh.triangles, mesh.uvs, light, texture, zBuffer, projectionMatrix, &renderImage)
    case 7: DrawTexturedPhongShaded(mesh.transformedVertices, mesh.triangles, mesh.uvs, mesh.transformedNormals, light, texture, zBuffer, projectionMatrix, &renderImage)
}
After that, we can use the renderImage.data to update our renderTexture, and then draw the texture to the screen much faster with raylib's DrawTexture procedure. After we finish drawing, we also mustn't forget to clear the image for the next frame with the ImageClearBackground procedure.
rl.UpdateTexture(renderTexture, renderImage.data)
rl.DrawTexture(renderTexture, 0, 0, rl.WHITE)
rl.DrawFPS(10, 10)
rl.ImageClearBackground(&renderImage, rl.BLACK)

rl.EndDrawing()
Conclusion
And that’s it! If you compile and run (odin run . -o:speed), you should see the frame rate significantly improved. On my machine, the software renderer draws roughly twice as fast.
Although we only changed the draw.odin and main.odin files, the changes were quite invasive. If anything doesn’t work as expected, you can always compare your version with the implementation for this part in this GitHub repository. In the next part, we're going to implement switching between perspective and orthographic projections during runtime.
Before we wrap this up today, I just want to point out that since we now have our frame stored in a buffer, we can do all sorts of things with the data before we actually draw that frame on the screen. For example, we can dedicate a key that, when pressed, stores the current frame as an image on disk, or we can dedicate a key that, when pressed, uses the current frame as the texture for the mesh in subsequent frames. When this is done repeatedly with a cube, it can produce this interesting recursive effect. If you wish, you can implement that as a little exercise (HINT: set both SCREEN_WIDTH and SCREEN_HEIGHT to 512).
Enjoyed this article? Support my work ❤️
All content on this blog, which I've already put hundreds of hours into, is and always will be free.
No ads. No paywalls. No tricks.
I've personally paid for a lot of educational content, but I strongly believe knowledge should be accessible to everyone.
I also pay to keep this blog up and running, and if you like what I do here, if it has helped you, and you would like to support me, you can

Even a small contribution, the price of a coffee, is very much appreciated.
Other Parts of This Series
- Software Renderer in Odin from Scratch, Part I
- Software Renderer in Odin from Scratch, Part II
- Software Renderer in Odin from Scratch, Part III
- Software Renderer in Odin from Scratch, Part IV
- Software Renderer in Odin from Scratch, Part V
- Software Renderer in Odin from Scratch, Part VI
- Software Renderer in Odin from Scratch, Part VII
- Software Renderer in Odin from Scratch, Part VIII
- Software Renderer in Odin from Scratch, Part IX
- Software Renderer in Odin from Scratch, Part X
- Software Renderer in Odin from Scratch, Part XI
- Software Renderer in Odin from Scratch, Part XII
- Software Renderer in Odin from Scratch, Part XIII
- Software Renderer in Odin from Scratch, Part XIV


