How to Create a Level Sequence in Unreal Engine at Runtime
29th September 2024 • 17 min read
Unreal Engine already offers an excellent toolchain for creating cinematic content in the editor, and there's comprehensive documentation from which you can learn all about how to use Level Sequences and more. The page is titled Sequences, Shots, and Takes.
However, when it comes to working with sequences in C++, all I was able to find were scattered bits and pieces of information and threads by people asking questions like, "Is it possible to edit a level sequence at runtime?"
That's why I decided to dig a bit deeper into this topic, because there might be cases where you want to construct a level sequence in C++ at runtime, for example, in the context of automated testing.
In this post, I'll show you how to create a sequence in C++, how to bind an actor to this sequence, and how to add keyframes either from an array of your own custom types or by copying them from another sequence.
If you want to follow along, and I encourage you to do so, I recommend using Unreal Engine 5.4.4, which is currently the latest version and the one I tested the following implementation with, including testing in both development and shipping builds. It might work in other versions without changes, but I can't guarantee that.
I'm also going to assume you have a basic understanding of Unreal Engine, know how to work with Sequencer in the editor, and understand what tracks and keyframes are. If not, please read the Sequencer Basics page in Unreal Engine documentation.
Preparing a Blank Project
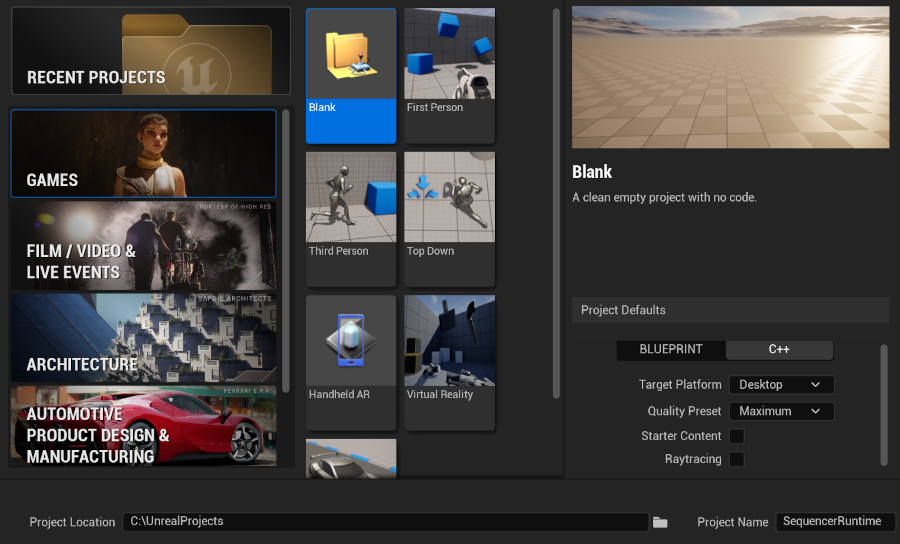
Let's start by creating a blank game project. We're not going to need any starter content, and we'll be implementing our own custom class. Thus, when creating a new project, set C++ in the Project Defaults section.
After you finish your coffee, a chapter of a book you're currently reading, or whatever else you do while Unreal Engine is creating a new project, add a new C++ class derived from Actor and name it SequenceFactory. Yes! In this tutorial, we're going to dive into code right from the beginning.
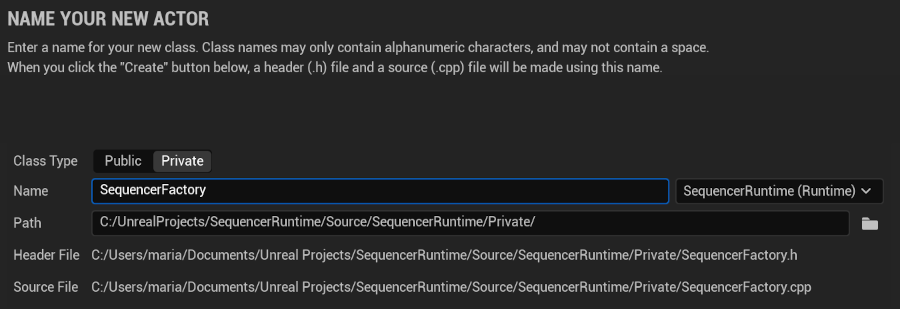
This class, as the name suggests, will be responsible for instantiating a Level Sequence, binding an object to it, and adding a track with keyframes either from an array of FTransformKeyframe, a struct we're going to define, or from another sequence.
Header File
At the top of SequenceFactory.h, after the include statements, let's first forward declare a couple of engine classes and structs we're going to use.
class AActor;
class UMovieScene;
class ULevelSequence;
class UMovieScene3DTransformSection;
struct FMovieSceneChannelProxy;
struct FMovieSceneDoubleChannel;
struct FFrameNumber;
As we progress, you'll understand what each of them is for. Next, we define an enum class to set an interpolation mode for each keyframe.
UENUM()
enum class EKeyInterpolation : uint8
{
    Auto,
    Linear,
    Constant,
    Cubic
};
We define yet another enum class to select whether we want to add keyframes from an array or copy them from another sequence.
UENUM()
enum class EKeyframesDataSource : uint8
{
    Array,
    SourceLevelSequence
};
And finally, let's define a struct for storing information about a single keyframe. Later, we're going to use an array of this type to add keyframes to a transform track of a dynamically created level sequence.
USTRUCT()
struct FTransformKeyframe
{
    GENERATED_BODY()

public:
    UPROPERTY(EditAnywhere)
    FTransform Transform;

    UPROPERTY(EditAnywhere)
    double TimeInSeconds;

    UPROPERTY(EditAnywhere)
    EKeyInterpolation KeyInterpolation;
};
For every keyframe, we store the time in seconds at which the keyframe should be added to the transform track, a transform, Location, Rotation, and Scale, and an interpolation mode as EKeyInterpolation, which we defined earlier.
Now we have all the custom helper types we need, and we can start adding functions to the ASequencerFactory class. First, after BeginPlay, in the protected section, define the functions we're going to use to create a sequence, bind an object to it, and add a transform track, respectively.
void CreateSequence(UMovieScene*& MovieScene);

void BindObjectToSequence(UMovieScene* MovieScene, FGuid& BindingID);

static void AddTransformTrack(UMovieScene* MovieScene, FGuid BindingID, UMovieScene3DTransformSection*& TransformSection);
Next, define the functions that will be executed when we add keyframes from an array of FTransformKeyframe.
void AddKeyFramesFromArray(const UMovieScene* MovieScene, const UMovieScene3DTransformSection* TransformSection);
static void AddKeyFrameToChannel(FMovieSceneDoubleChannel* Channel, const FFrameNumber& FrameNumber, double Value, EKeyInterpolation KeyInterpolation);
And below these definitions, add the ones for copying keyframes from another sequence.
void AddKeyFramesFromSourceLevelSequence(const UMovieScene3DTransformSection* TransformSection) const;
static void CopyChannel(const FMovieSceneChannelProxy& SourceChannelProxy, const FMovieSceneChannelProxy& TargetChannelProxy, uint32 ChannelIndex);
The last two members we're going to define in the protected section are a function for playing a sequence and a pointer to the sequence we're going to instantiate and play, for demonstration purposes, in BeginPlay.
void PlaySequence() const;

UPROPERTY(VisibleAnywhere)
ULevelSequence* LevelSequence = nullptr;
In the public section, we need to define a couple of properties that we're going to set later in the editor via the Details tab:
- A target actor to be bound to a level sequence.
- An array of
FTransformKeyframeto store our keyframes. - A frame rate for the sequence with a default value of 60 FPS.
- A length for the sequence in seconds, with a default value of 60.
- Another level sequence to copy frames from, if we prefer to do so instead of adding them from the array.
- An
EKeyframesDataSourceto determine whether we wish to add keyframes from an array or copy them from another sequence.
UPROPERTY(EditAnywhere)
AActor* TargetActor = nullptr;

UPROPERTY(EditAnywhere)
TArray<FTransformKeyframe> Keyframes;

UPROPERTY(EditAnywhere)
FFrameRate FrameRate = FFrameRate(60,1);

UPROPERTY(EditAnywhere)
double SequenceLengthInSeconds = 60;

UPROPERTY(EditAnywhere)
ULevelSequence* SourceLevelSequence = nullptr;

UPROPERTY(EditAnywhere)
EKeyframesDataSource KeyframesDataSource = EKeyframesDataSource::Array;
And with that, our header file is complete, and we can move on to the fun part: the implementation.
Source File
Let's start with BeginPlay to outline what our SequenceFactory will be doing from a higher level.
void ASequencerFactory::BeginPlay()
{
    Super::BeginPlay();

    UMovieScene* MovieScene;
    CreateSequence(MovieScene);

    FGuid BindingID;
    BindObjectToSequence(MovieScene, BindingID);

    UMovieScene3DTransformSection* TransformSection;
    AddTransformTrack(MovieScene, BindingID, TransformSection);

    switch (KeyframesDataSource)
    {
    case EKeyframesDataSource::Array:
        AddKeyFramesFromArray(MovieScene, TransformSection);
        break;
    case EKeyframesDataSource::SourceLevelSequence:
        AddKeyFramesFromSourceLevelSequence(TransformSection);
        break;
    }

    PlaySequence();
}
As you can see, we first create a sequence, then we bind an object to this sequence and add a transform track. After that, we add keyframes according to the value of EKeyframesDataSource::KeyframesDataSource, and at the end, we simply play the fully initialized level sequence.
Now, let's continue with the implementation of the CreateSequence function, which accepts a pointer to UMovieScene that points to a nullptr at this moment and will be instantiated in this function. UMovieScene and ULevelSequence are tightly coupled, as you will see soon.
void ASequencerFactory::CreateSequence(UMovieScene*& MovieScene)
{
    LevelSequence = NewObject<ULevelSequence>(this, ULevelSequence::StaticClass());
    LevelSequence->Initialize();

    MovieScene = LevelSequence->GetMovieScene();
    MovieScene->SetDisplayRate(FrameRate);

    const uint32 Duration = MovieScene->GetTickResolution().AsFrameNumber(SequenceLengthInSeconds).Value;
    MovieScene->SetPlaybackRange(FFrameNumber(0), Duration);
}
Notice how we first needed to calculate a duration in frames based on the tick resolution, which is a different value than our FrameRate, which we set by default to 60 FPS.
When we have our LevelSequence and MovieScene initialized, it's time to bind our TargetActor. However, it might be useful to bind the default player pawn, so let's do that by assigning it to the TargetActor when it's not already set to point to another actor. In this case, let's also disable the player controller's input to prevent interference with the sequence.
void ASequencerFactory::BindObjectToSequence(UMovieScene* MovieScene, FGuid& BindingID)
{
    if (!TargetActor)
    {
        // Bind default pawn if TargetActor is not set
        APlayerController* PlayerController = GetWorld()->GetFirstPlayerController();
        TargetActor = PlayerController->GetPawn();
        TargetActor->DisableInput(PlayerController);
    }

    BindingID = MovieScene->AddPossessable(TargetActor->GetName(), TargetActor->GetClass());
    LevelSequence->BindPossessableObject(BindingID, *TargetActor, TargetActor->GetWorld());
}
We're going to need the BindingID that is returned from the UMovieScene::AddPossessable function, which is why we created an uninitialized one in the calling function and passed it here by reference.
At this point, we have a level sequence with an actor bound to it, and we can add a track, but we also need to create a section within this track and set its range. In this simple example, setting the range to the same value as the range of the entire sequence would be sufficient.
void ASequencerFactory::AddTransformTrack(UMovieScene* MovieScene, const FGuid BindingID, UMovieScene3DTransformSection*& TransformSection)
{
    UMovieScene3DTransformTrack* TransformTrack = MovieScene->AddTrack<UMovieScene3DTransformTrack>(BindingID);
    TransformSection = Cast<UMovieScene3DTransformSection>(TransformTrack->CreateNewSection());
    TransformSection->SetRange(MovieScene->GetPlaybackRange());
    TransformTrack->AddSection(*TransformSection);
}
This function initializes our TransformSection, so now we can start adding keyframes, first, from our array of FTransformKeyframe.
void ASequencerFactory::AddKeyFramesFromArray(const UMovieScene* MovieScene, const UMovieScene3DTransformSection* TransformSection)
{
    const FMovieSceneChannelProxy& ChannelProxy = TransformSection->GetChannelProxy();

    FMovieSceneDoubleChannel* TranslationXChannel = ChannelProxy.GetChannel<FMovieSceneDoubleChannel>(0); // X
    FMovieSceneDoubleChannel* TranslationYChannel = ChannelProxy.GetChannel<FMovieSceneDoubleChannel>(1); // Y
    FMovieSceneDoubleChannel* TranslationZChannel = ChannelProxy.GetChannel<FMovieSceneDoubleChannel>(2); // Z

    FMovieSceneDoubleChannel* RotationXChannel = ChannelProxy.GetChannel<FMovieSceneDoubleChannel>(3); // Roll
    FMovieSceneDoubleChannel* RotationYChannel = ChannelProxy.GetChannel<FMovieSceneDoubleChannel>(4); // Pitch
    FMovieSceneDoubleChannel* RotationZChannel = ChannelProxy.GetChannel<FMovieSceneDoubleChannel>(5); // Yaw

    FMovieSceneDoubleChannel* ScaleXChannel = ChannelProxy.GetChannel<FMovieSceneDoubleChannel>(6); // Scale X
    FMovieSceneDoubleChannel* ScaleYChannel = ChannelProxy.GetChannel<FMovieSceneDoubleChannel>(7); // Scale Y
    FMovieSceneDoubleChannel* ScaleZChannel = ChannelProxy.GetChannel<FMovieSceneDoubleChannel>(8); // Scale Z

    for (int32 i = 0; i < Keyframes.Num(); ++i)
    {
        auto [Transform, TimeInSeconds, KeyInterpolation] = Keyframes[i];

        const FVector Location = Transform.GetLocation();
        const FRotator Rotation = Transform.GetRotation().Rotator();
        const FVector Scale = Transform.GetScale3D();

        const FFrameNumber FrameNumber = MovieScene->GetTickResolution().AsFrameNumber(TimeInSeconds);

        AddKeyFrameToChannel(TranslationXChannel, FrameNumber, Location.X, KeyInterpolation);
        AddKeyFrameToChannel(TranslationYChannel, FrameNumber, Location.Y, KeyInterpolation);
        AddKeyFrameToChannel(TranslationZChannel, FrameNumber, Location.Z, KeyInterpolation);

        AddKeyFrameToChannel(RotationXChannel, FrameNumber, Rotation.Roll, KeyInterpolation);
        AddKeyFrameToChannel(RotationYChannel, FrameNumber, Rotation.Pitch, KeyInterpolation);
        AddKeyFrameToChannel(RotationZChannel, FrameNumber, Rotation.Yaw, KeyInterpolation);

        AddKeyFrameToChannel(ScaleXChannel, FrameNumber, Scale.X, KeyInterpolation);
        AddKeyFrameToChannel(ScaleYChannel, FrameNumber, Scale.Y, KeyInterpolation);
        AddKeyFrameToChannel(ScaleZChannel, FrameNumber, Scale.Z, KeyInterpolation);
    }
}
This function looks a bit longer, but that's just because we need to add frames to each channel individually. There are 9 channels in a transform section: 3 for location, 3 for rotation, and 3 for scale, with respective indices from 0 to 8.
We can't access the channels directly, but we need to use a reference toFMovieSceneChannelProxy returned from UMovieSceneSection::GetChannelProxy(). We get channels using the proxy one by one and then loop through our array of keyframes, adding our keyframes to the respective channels using our AddKeyFrameToChannel function.
Notice how we calculate a FrameNumber from the TimeInSeconds of a keyframe using the tick resolution of our MovieScene once again.
In the AddKeyFrameToChannel function, we finally add a keyframe to the passed channel according to the interpolation mode of the keyframe being added.
void ASequencerFactory::AddKeyFrameToChannel(FMovieSceneDoubleChannel* Channel, const FFrameNumber& FrameNumber, const double Value, const EKeyInterpolation KeyInterpolation)
{
    switch (KeyInterpolation) {
    case EKeyInterpolation::Auto:
        AddKeyToChannel(Channel, FrameNumber, Value, EMovieSceneKeyInterpolation::Auto);
        break;
    case EKeyInterpolation::Linear:
        Channel->AddLinearKey(FrameNumber, Value);
        break;
    case EKeyInterpolation::Constant:
        Channel->AddConstantKey(FrameNumber, Value);
        break;
    case EKeyInterpolation::Cubic:
        Channel->AddCubicKey(FrameNumber, Value);
        break;
    }
}
Our class would be almost done, but creating a transform track from keyframes of values manually typed in the Details tab is useful only for a very simple sequence, one or two keyframes at most.
For a more elaborate one, it would be more practical to use the Sequencer in the editor with a dummy actor and then copy keyframes to our level sequence created at runtime. Let's implement the two functions we defined for this purpose.
void ASequencerFactory::AddKeyFramesFromSourceLevelSequence(const UMovieScene3DTransformSection* TransformSection) const
{
    const FMovieSceneChannelProxy& TargetChannelProxy = TransformSection->GetChannelProxy();

    const TArray<FMovieSceneBinding>& ObjectBindings = SourceLevelSequence->GetMovieScene()->GetBindings();
    for (const FMovieSceneBinding& Binding : ObjectBindings)
    {
        const TArray<UMovieSceneTrack*>& Tracks = Binding.GetTracks();
        for (UMovieSceneTrack* Track : Tracks)
        {
            const TArray<UMovieSceneSection*>& TransformSections = Cast<UMovieScene3DTransformTrack>(Track)->GetAllSections();
            for (UMovieSceneSection* Section : TransformSections)
            {
                UMovieScene3DTransformSection* SourceTransformSection = Cast<UMovieScene3DTransformSection>(Section);

                const FMovieSceneChannelProxy& SourceChannelProxy = SourceTransformSection->GetChannelProxy();

                CopyChannel(SourceChannelProxy, TargetChannelProxy, 0); // X
                CopyChannel(SourceChannelProxy, TargetChannelProxy, 1); // Y
                CopyChannel(SourceChannelProxy, TargetChannelProxy, 2); // Z

                CopyChannel(SourceChannelProxy, TargetChannelProxy, 3); // Roll
                CopyChannel(SourceChannelProxy, TargetChannelProxy, 4); // Pitch
                CopyChannel(SourceChannelProxy, TargetChannelProxy, 5); // Yaw

                CopyChannel(SourceChannelProxy, TargetChannelProxy, 6); // Scale X
                CopyChannel(SourceChannelProxy, TargetChannelProxy, 7); // Scale Y
                CopyChannel(SourceChannelProxy, TargetChannelProxy, 8); // Scale Z
            }
        }
    }
}
This function works similarly to our previously implemented AddKeyFramesFromArray, but this time we need to first access the source tracks through object bindings. Then, we access the transform section through the tracks, and from the transform section, we finally get channel proxies to copy channel data between using a CopyChannel helper function that we're going to implement now.
void ASequencerFactory::CopyChannel(const FMovieSceneChannelProxy& SourceChannelProxy, const FMovieSceneChannelProxy& TargetChannelProxy, const uint32 ChannelIndex)
{
    FMovieSceneDoubleChannel* SourceChannel = SourceChannelProxy.GetChannel<FMovieSceneDoubleChannel>(ChannelIndex);
    FMovieSceneDoubleChannel* TargetChannel = TargetChannelProxy.GetChannel<FMovieSceneDoubleChannel>(ChannelIndex);

    const TArrayView<const FFrameNumber>& SourceTimes = SourceChannel->GetTimes();
    const TArrayView<const FMovieSceneDoubleValue>& SourceValues = SourceChannel->GetValues();

    for (int32 i = 0; i < SourceTimes.Num(); ++i)
    {
        switch (SourceValues[i].InterpMode)
        {
        case RCIM_Linear:
            TargetChannel->AddLinearKey(SourceTimes[i], SourceValues[i].Value);
            break;
        case RCIM_Constant:
            TargetChannel->AddConstantKey(SourceTimes[i], SourceValues[i].Value);
            break;
        case RCIM_Cubic:
            TargetChannel->AddCubicKey(SourceTimes[i], SourceValues[i].Value);
            break;
        default:
            AddKeyToChannel(TargetChannel, SourceTimes[i], SourceValues[i].Value, EMovieSceneKeyInterpolation::Auto);
            break;
        }
    }
}
Nothing much new here; we once again copy frames from one structure to another, as in the AddKeyFrameToChannel function, only this time the source structure is a little different. The last function we need to implement is PlaySequence.
void ASequencerFactory::PlaySequence() const
{
    const FMovieSceneSequencePlaybackSettings PlaybackSettings;
    ALevelSequenceActor* SequenceActor = nullptr;
    ULevelSequencePlayer* SequencePlayer = ULevelSequencePlayer::CreateLevelSequencePlayer(GetWorld(), LevelSequence, PlaybackSettings, SequenceActor);

    SequencePlayer->Play();
}
As you can see, to play a sequence, you need an instance of a ULevelSequencePlayer, which you can create using the static function ULevelSequencePlayer::CreateLevelSequencePlayer. We pass the World, our LevelSequence to play, an ALevelSequenceActor that will be initialized in this function, and an FMovieSceneSequencePlaybackSettings struct, which we didn't touch, so all values will be the default ones. I recommend looking at these options in MovieSceneSequencePlaybackSettings.h.
Testing SequencerFactory in Editor
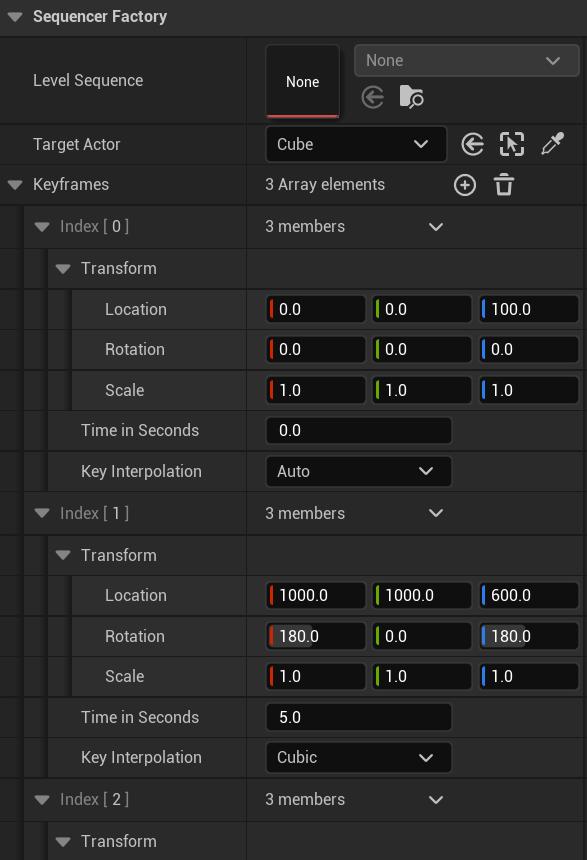
Our SequencerFactory is complete; you just need to add modules LevelSequence, MovieScene, and MovieSceneTracks to SequencerRuntime.Build.cs, and you should be able to compile the project. In the editor, add an instance of SequencerFactory C++ class to an empty map, then add a Cube and set it as the TargetActor of SequencerFactory in the Details tab.
Then define a couple of keyframes with time, location, rotation, and scale values, and when you hit Play, you should see the cube moving, rotating, and scaling according to the keyframes you set.
Now add an Actor to your map and name it Dummy, for instance. Then add a new Level Sequence in the Content Browser (RMB → Cinematics → Level Sequence). Open this sequence in the Sequencer, bind the Dummy actor, and add a transform track with a couple of different keyframes.
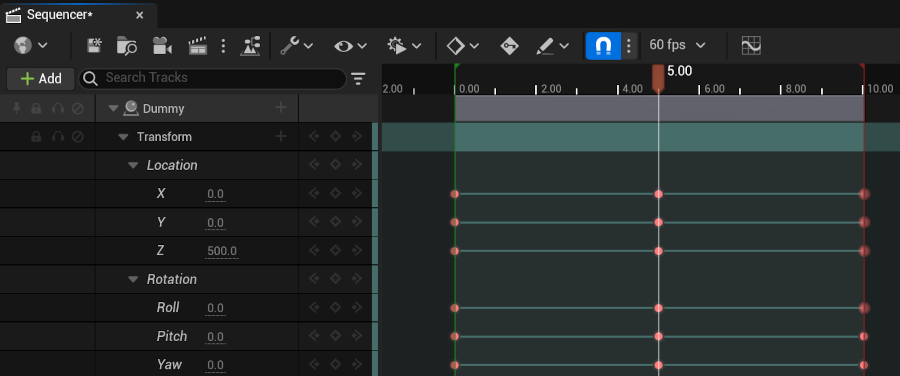
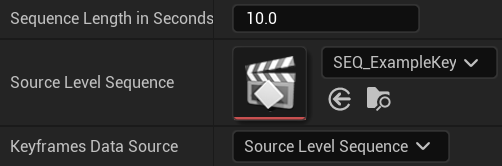
Then assign this new level sequence to the Source Level Sequence property of SequencerFactory and change the Keyframes Data Source from Array to Source Level Sequence.
In Play mode, you should now see the Cube moving according to the level sequence you created in the Sequencer. You can try both options with a default pawn; however, to see the movement, you need a pawn with a camera that rotates with the pawn's rotation. That would be outside the scope of this post, but if you download and open the example project, you can find such a setup in the Example map with a custom game mode named BP_ExampleGameMode and a pawn named BP_ExamplePawn.
Conclusion
That's it for today. I hope you found this post useful. You learned how to create a level sequence in C++, how to bind an actor to this sequence, add keyframes from a custom structure or by copying them from another sequence, and finally, how to play the sequence.
There's, of course, more you can do with these types, but I think this is a good basis from which you can expand your knowledge further by experimenting and examining relevant Unreal Engine code.
Enjoyed this article? Support my work ❤️
All content on this blog, which I've already put hundreds of hours into, is and always will be free.
No ads. No paywalls. No tricks.
I've personally paid for a lot of educational content, but I strongly believe knowledge should be accessible to everyone.
I also pay to keep this blog up and running, and if you like what I do here, if it has helped you, and you would like to support me, you can

Even a small contribution, the price of a coffee, is very much appreciated.


