FFmpeg Subsystem for Screen Recording in Unreal Engine, Part II
18th December 2024 • 22 min read
In the previous part, we learned how to set up a plugin in Unreal Engine to wrap third-party libraries, specifically FFmpeg libraries such as avdevice, avformat, avcodec, and swscale.
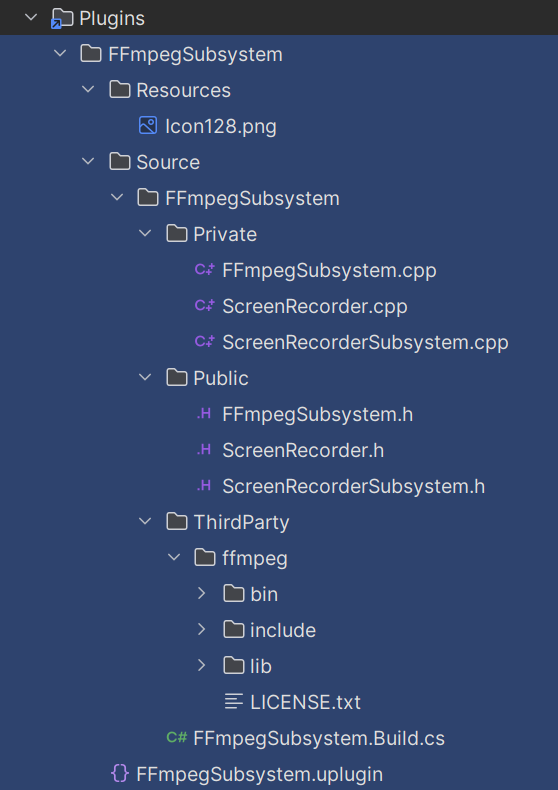
Today, we will continue by looking more closely at the internal implementation of this plugin that will provide a subsystem with a convenient Blueprint-exposed API. This API will include methods like StartRecording and StopRecording, as well as a struct for passing basic options such as video size, offset position, output file name, frame rate, and several others.
If this is our first encounter with subsystems in Unreal Engine, I recommend reading the Programming Subsystems in Unreal Engine documentation to understand how subsystems can be useful not just in the context this post illustrates.
Screen Recorder Class
Though I sometimes like to build things from the top, while making this plugin, I started from the bottom with the ScreenRecorder.h, declaring the FScreenRecorderOptions and UScreenRecorder classes, as well as a log category macro to be able to filter out relevant lines in the Unreal Editor output log.
#include "CoreMinimal.h"
#include "UObject/NoExportTypes.h"

#include "ScreenRecorder.generated.h"

DECLARE_LOG_CATEGORY_EXTERN(LogScreenRecorder, Log, All);

USTRUCT(BlueprintType)
struct FScreenRecorderOptions
{
    GENERATED_BODY()

    UPROPERTY(BlueprintReadWrite, EditAnywhere)
    FString OutputFilePath = TEXT("output.mp4");

    UPROPERTY(BlueprintReadWrite, EditAnywhere)
    int32 SourceWidth = 1920;

    UPROPERTY(BlueprintReadWrite, EditAnywhere)
    int32 SourceHeight = 1080;

    UPROPERTY(BlueprintReadWrite, EditAnywhere)
    int32 TargetWidth = 1920;

    UPROPERTY(BlueprintReadWrite, EditAnywhere)
    int32 TargetHeight = 1080;

    // 0,0 is the top-left corner
    UPROPERTY(BlueprintReadWrite, EditAnywhere)
    int32 OffsetX = 0;

    UPROPERTY(BlueprintReadWrite, EditAnywhere)
    int32 OffsetY = 0;

    UPROPERTY(BlueprintReadWrite, EditAnywhere)
    int32 FrameRate = 30;
};

UCLASS()
class FFMPEGSUBSYSTEM_API UScreenRecorder : public UObject
{
    GENERATED_BODY()
public:
    void Initialize();
    void StartRecording(const FScreenRecorderOptions& Options);
    void StopRecording();

private:
    bool bIsInitialized;
    bool bIsRecording;
};
To keep things simple, FScreenRecorderOptions exposes the bare minimum that a user of this plugin might need or want to set. There are many additional options we could have exposed, as you'll soon see in the implementation of the StartRecording function. These can always be exposed later if needed.
Notice that we decorated the struct with the USTRUCT(BlueprintType) macro to expose it as a type that can be used in Blueprints. You can read more about these options in Structs page in the Unreal Engine documentation.
The ScreenRecorder has a very minimalistic API. After a caller initializes it using the Initialize function, the caller is free to call StartRecording while passing a reference to the options, and eventually call StopRecording. Boolean variables protect the caller from calling StartRecording multiple times before StopRecording is called and from working with an uninitialized object.
Now, let's proceed with the source file, ScreenRecorder.cpp, which makes the biggest chunk of this implementation. First, we need to include a couple of header files.
#include "ScreenRecorder.h"
#include "Async/Async.h"

extern "C" {
#include "libavdevice/avdevice.h"
#include "libavformat/avformat.h"
#include "libavcodec/avcodec.h"
#include "libswscale/swscale.h"
}
The recording must run asynchronously because we need the main thread to be used for what we wish to record. For this, we included Async.h. The following includes come with the FFmpeg libraries and must be enclosed within the scope of linkage specification extern "C", which instructs the compiler to use C-style linking for compatibility with C libraries, preventing C++ name mangling. Without this, we would get linker errors.
In ScreenRecorder.h, we used a macro to declare a log category. Therefore, in the source file, we need to use another macro to define it.
DEFINE_LOG_CATEGORY(LogScreenRecorder);
The Initialize function is very simple. We call avdevice_register_all to initialize the avdevice library and register all input and output devices. Setting the log verbosity level to AV_LOG_DEBUG is optional but very useful for debugging. In production, this setting can be removed, commented out, or changed to AV_LOG_INFO. Finally, we set the bIsInitialized flag, and we're done here.
void ScreenRecorder::Initialize()
{
    avdevice_register_all();

    av_log_set_level(AV_LOG_DEBUG);

    bIsInitialized = true;
}
Now, let's take a look at the StartRecording function. I’m not a fan of long functions, but after every attempt to refactor this into smaller chunks, the original version actually seemed more readable, even though it exceeds 15 lines of code, or whatever some golden rule of clean code dictates a function should not exceed… Anyway, since this function is more complex, I'll go over it in smaller chunks.
void ScreenRecorder::StartRecording(const FScreenRecorderOptions& Options)
{
    if (!bIsInitialized)
    {
        UE_LOG(LogScreenRecorder, Warning, TEXT("ScreenRecorder is not initialized. Call UScreenRecorder::Initialize() first or use ScreenRecorderSubsystem."));
        return;
    }

    if (bIsRecording)
    {
        UE_LOG(LogScreenRecorder, Warning, TEXT("ScreenRecorder is already recording"));
        return;
    }
First, we check whether the ScreenRecorder object has been initialized or if recording is already in progress. If either is true, we warn the user and return early. Otherwise, we can proceed with capturing options and passing them into a lambda parameter of the Async function call.
const FString OutputFilePath = Options.OutputFilePath;
const int32 SourceWidth = Options.SourceWidth;
const int32 SourceHeight = Options.SourceHeight;
const int32 TargetWidth = Options.TargetWidth;
const int32 TargetHeight = Options.TargetHeight;
const int32 FrameRate = Options.FrameRate;
const int32 OffsetX = Options.OffsetX;
const int32 OffsetY = Options.OffsetY;

Async(EAsyncExecution::Thread, [this, OutputFilePath, SourceWidth, SourceHeight, TargetWidth, TargetHeight, OffsetX, OffsetY, FrameRate]()
{
I find capturing individual properties like this generally safer, as it helps avoid dangling references. If the struct goes out of scope or is destroyed before the lambda is executed, capturing the struct directly could result in undefined behavior or a nullptr exception. A more experienced friend once gave me this advice (if you're reading this, thank you :-).
Even though this can't happen in this context, since Options is a member of the class, I consider this a good practice for another reason: readability. This approach also makes lambda more readable by clearly showing which fields are used within its scope, while removing the need to repeatedly type Options. to access them.
Inside the lambda, let's first declare and initialize pointers, though just as null pointers, for the input and output format contexts from the avformat library. Later, we'll pass these to a function where they'll be assigned a proper value.
AVFormatContext* InputFormatContext = nullptr;
AVFormatContext* OutputFormatContext = nullptr;
Next, we need an AVInputFormat object, which we get by using the av_find_input_format function, passing gdigrab as a parameter. This indicates that we want to use the GDI screen capture device as the input format.
const AVInputFormat* InputFormat = av_find_input_format("gdigrab");
if (!InputFormat)
{
    UE_LOG(LogScreenRecorder, Error, TEXT("Failed to find GDI for screen capture"));
    return;
}
GDI refers to the Graphics Device Interface. It's a core Windows component that provides a set of APIs for representing graphical objects and transmitting them to output devices. In the context of gdigrab in FFmpeg, GDI is used as a screen capture device for grabbing the desktop.
If we don't get any (InputFormat is nullptr), we log an error and return early from the lambda. Otherwise, we proceed by creating an AVDictionary to pass options to the avformat_open_input function.
AVDictionary* OptionsDict = nullptr;
FString VideoSize = FString::Printf(TEXT("%dx%d"), SourceWidth, SourceHeight);
av_dict_set(&OptionsDict, "video_size", TCHAR_TO_ANSI(*VideoSize), 0);
av_dict_set(&OptionsDict, "framerate", TCHAR_TO_ANSI(*FString::FromInt(FrameRate)), 0);
av_dict_set(&OptionsDict, "offset_x", TCHAR_TO_ANSI(*FString::FromInt(OffsetX)), 0);
av_dict_set(&OptionsDict, "offset_y", TCHAR_TO_ANSI(*FString::FromInt(OffsetY)), 0);
av_dict_set(&OptionsDict, "probesize", "5000000", 0);
av_dict_set(&OptionsDict, "analyzeduration", "5000000", 0);

FString ScreenDevice = "desktop";
bool bAvFormatInputOpen = avformat_open_input(&InputFormatContext, TCHAR_TO_ANSI(*ScreenDevice), InputFormat, &OptionsDict) < 0;
av_dict_free(&OptionsDict);
if (bAvFormatInputOpen)
{
    UE_LOG(LogScreenRecorder, Error, TEXT("Failed to open input device for screen capture"));
    return;
}
Notice the usage of the TCHAR_TO_ANSI macro that converts FString (which uses TCHAR internally) to an ANSI string format because FFmpeg libraries expect C-style char* strings in ANSI encoding. The av_dict_set function adds key-value pairs to the AVDictionary. It accepts a reference to a dictionary, a key, a value, and a flag. 0 means no flags.
Most of the values are self-explanatory, and we set them from our captured properties that come from FScreenRecorderOptions, except for probesize and analyzeduration, which are hardcoded to 5000000 bytes and 5000000 microseconds, respectively, ensuring sufficient data is read and analyzed to correctly detect and configure the input format.
The avformat_open_input function returns a negative number in case of an error. We use that to return early from the lambda if the call fails. After the function is called to configure the input device for screen recording, the dictionary is no longer needed because the library internally copies the relevant options. Therefore, we can use av_dict_free to deallocate the memory used by the dictionary.
Next, we need to set InputCodec using avcodec_find_decoder, which finds a decoder matching the codec ID in the first stream of the input format context. Once again, we return early if the search is unsuccessful, in which case the InputCodec is nullptr.
const AVCodec* InputCodec = avcodec_find_decoder(InputFormatContext->streams[0]->codecpar->codec_id);
if (!InputCodec)
{
    UE_LOG(LogScreenRecorder, Error, TEXT("Failed to find input decoder for input stream"));
    return;
}
Once we have InputCodec, we need to allocate an InputCodecContext using the avcodec_alloc_context3 function.
AVCodecContext* InputCodecContext = avcodec_alloc_context3(InputCodec);
if (!InputCodecContext)
{
    UE_LOG(LogScreenRecorder, Error, TEXT("Failed to allocate input codec context"));
    return;
}
And copy the codec parameters from the input stream to the codec context using the avcodec_parameters_to_context function. We still follow the same error handling pattern.
if (avcodec_parameters_to_context(InputCodecContext, InputFormatContext->streams[0]->codecpar) < 0)
{
    UE_LOG(LogScreenRecorder, Error, TEXT("Failed to copy codec parameters to codec context"));
    return;
}
Next, we need to initialize the InputCodecContext to use the InputCodec. We don't need to pass any additional options here, hence the nullptr as the last argument.
if (avcodec_open2(InputCodecContext, InputCodec, nullptr) < 0)
{
    UE_LOG(LogScreenRecorder, Error, TEXT("Failed to open input codec for input stream"));
    return;
}
And use avformat_find_stream_info to read additional packets from the input to gather information about the stream in the input format context. We don't need to pass any additional options here either.
if (avformat_find_stream_info(InputFormatContext, nullptr) < 0)
{
    UE_LOG(LogScreenRecorder, Error, TEXT("Failed to find stream information"));
    return;
}
Now that we have our input stream ready, we move on to the output stream. We start by allocating OutputFormatContext using the avformat_alloc_output_context2 function. The second argument is nullptr because we're specifying the format name as mp4 and providing the path to the output file.
if (avformat_alloc_output_context2(&OutputFormatContext, nullptr, "mp4", TCHAR_TO_ANSI(*OutputFilePath)) < 0)
{
    UE_LOG(LogScreenRecorder, Error, TEXT("Failed to allocate output format context"));
    return;
}
The next step is finding a codec by name using the avcodec_find_encoder_by_name function. The libx264 codec is a widely used open-source implementation of the H.264 video compression standard, known for its high-quality compression and good performance.
const AVCodec* Codec = avcodec_find_encoder_by_name("libx264");
if (!Codec)
{
    UE_LOG(LogScreenRecorder, Error, TEXT("Failed to find specified codec"));
    return;
}
This whole part could have been implemented better. We could recognize the output format by file extension and support multiple codecs. However, to keep things simple and focused, I hardcoded the format name and decided to use only libx264. After reading this post and additional resources about different codecs, I believe you'll have enough knowledge to implement support for other codecs as well.
We also need a codec context, which we create using the avcodec_alloc_context3 function, passing in the Codec pointer.
AVCodecContext* CodecContext = avcodec_alloc_context3(Codec);
if (!CodecContext)
{
    UE_LOG(LogScreenRecorder, Error, TEXT("Failed to allocate codec context"));
    return;
}
Once we have our codec context, it's time to configure it. This configuration closely mimics the setup used by ffmpeg.exe to record the screen on the Windows platform using gdigrab.
CodecContext->bit_rate = 0;
This allows the codec to use its bitrate control mechanism. For libx264, this means using the Constant Rate Factor (CRF) method.
CodecContext->width = TargetWidth;
CodecContext->height = TargetHeight;
The width and height match the target resolution from our ScreenRecorderOptions struct.
CodecContext->time_base.num = 1;
CodecContext->time_base.den = FrameRate;
The time base is set with a numerator of 1 and a denominator equal to the frame rate, defining the time unit per frame.
CodecContext->pix_fmt = AV_PIX_FMT_YUV420P;
The pixel format is set to YUV420P, a standard and also one of the supported output formats for libx264. Unlike RGB, the YUV color space separates luminance (brightness) from chrominance (color information), allowing for more efficient compression by reducing the resolution of color components (U and V) while preserving detail in brightness, which the human eye is more perceptive to.
CodecContext->codec_type = AVMEDIA_TYPE_VIDEO;
The codec is a video codec.
CodecContext->me_range = 16;
A typical value of motion estimation for desktop recordings.
CodecContext->qcompress = 0.6;
CodecContext->max_qdiff = 4;
The compression factor for quantization is set to balance quality and compression, and the maximum quantizer difference is limited to 4 to control quality variation.
CodecContext->level = 40;
The codec level is set to 4.0, ensuring compatibility with most devices.
CodecContext->gop_size = FrameRate * 10;
The group of pictures size is set to FrameRate * 10, which means a keyframe will be inserted approximately every 10 seconds.
CodecContext->max_b_frames = 3;
The maximum number of B-frames is set to 3 for improved compression efficiency.
CodecContext->qmin = 0;
CodecContext->qmax = 69;
Quantizer values are set to range from 0 to 69 to control the range of compression levels.
CodecContext->colorspace = AVCOL_SPC_BT709;
CodecContext->color_primaries = AVCOL_PRI_BT709;
CodecContext->color_trc = AVCOL_TRC_BT709;
CodecContext->color_range = AVCOL_RANGE_MPEG;
The BT.709 color space is a standard for HD video content, with the primaries for BT.709, ensuring accurate color representation. The transfer characteristics for BT.709 are used to map luminance values. and MPEG, limited range, sometimes also called TV range, is a standard for video encoding.
CodecContext->flags |= AV_CODEC_FLAG_GLOBAL_HEADER;
Finally, the AV_CODEC_FLAG_GLOBAL_HEADER flag means we want to place global headers in extradata instead of every keyframe.
Next, we need to open the codec and initialize its context using the avcodec_open2 function. We don't need to pass any additional options in this case.
if (avcodec_open2(CodecContext, Codec, nullptr) < 0)
{
    UE_LOG(LogFFmpegRecorder, Error, TEXT("Failed to open codec"));
    return;
}
We also need to create a new AVStream pointer for the output stream using the avformat_new_stream factory method.
AVStream* OutputStream = avformat_new_stream(OutputFormatContext, nullptr);
if (!OutputStream)
{
    UE_LOG(LogScreenRecorder, Error, TEXT("Failed to create output stream"));
    return;
}
A couple of lines earlier, we used the avcodec_parameters_to_context function. Now, we're going to use avcodec_parameters_from_context to copy the codec parameters from the codec context to the output stream codec parameters.
if (avcodec_parameters_from_context(OutputStream->codecpar, CodecContext) < 0)
{
    UE_LOG(LogFFmpegRecorder, Error, TEXT("Failed to copy codec parameters to output stream"));
    return;
}
Next, we use the avio_open function to open the output file. The AVIO_FLAG_WRITE flag specifies that the file should be opened in write mode.
if (avio_open(&OutputFormatContext->pb, TCHAR_TO_ANSI(*OutputFilePath), AVIO_FLAG_WRITE) < 0)
{
    UE_LOG(LogFFmpegRecorder, Error, TEXT("Failed to open output file"));
    return;
}
The avformat_write_header simplifies the process of writing a header to the output file.
if (avformat_write_header(OutputFormatContext, nullptr) < 0)
{
    UE_LOG(LogFFmpegRecorder, Error, TEXT("Failed to write header to output file"));
    return;
}
A header is necessary because it provides metadata about the output file, such as codec settings, stream information, and container format. This allows media players to interpret and decode the file correctly. Without it, the output file would be unreadable.
Soon, when initialization is complete, we'll use sws_scale to convert frames from the input color space (BGRA) to the YUV color space. To achieve this, we need a SwsContext. The factory method requires the input and output video resolutions, the source and target pixel formats, and a specifier for the scaling algorithm.
AVPixelFormat InputPixelFormat = (AVPixelFormat)InputFormatContext->streams[0]->codecpar->format;
SwsContext* SwsContext = sws_getContext(
    SourceWidth, SourceHeight, InputPixelFormat,
    TargetWidth, TargetHeight, AV_PIX_FMT_YUV420P,
    SWS_BICUBIC, nullptr, nullptr, nullptr
);

if (!SwsContext)
{
    UE_LOG(LogFFmpegRecorder, Error, TEXT("Failed to initialize SwsContext"));
    return;
}
We took the source pixel format from InputFormatContext and used the same resolution for both input and output. However, if you wish, you can set TargetWidth and TargetHeight that come from FScreenRecorderOptions to different values to produce a scaled video.
Now, we create an output frame with the av_frame_alloc function. The OutputFrame instance will be reused in our recording loop. We also initialize a frame buffer using av_frame_get_buffer to allocate memory for storing the pixel data for the frame.
The second argument can specify the memory alignment in bytes. A value of 0 means the alignment will be resolved automatically based on the current CPU, which is highly recommended.
AVFrame* OutputFrame = av_frame_alloc();
OutputFrame->width = TargetWidth;
OutputFrame->height = TargetHeight;
OutputFrame->format = AV_PIX_FMT_YUV420P;

if (av_frame_get_buffer(OutputFrame, 0) < 0)
{
    UE_LOG(LogFFmpegRecorder, Error, TEXT("Failed to allocate frame buffer"));
    return;
}
The last thing we need in our initialization logic is an instance of AVPacket to store data read from the input stream, another AVFrame to store a decoded frame, and a counter to track the number of processed frames.
AVPacket* Packet = av_packet_alloc();
AVFrame* DecodedFrame = av_frame_alloc();

int64 FrameCount = 0;
Now, we have everything set, and we can proceed to implement the main recording loop.
// Main recording loop
UE_LOG(LogScreenRecorder, Log, TEXT("Recording started"));
bIsRecording = true;
while (bIsRecording)
{
    if (av_read_frame(InputFormatContext, Packet) == 0)
    {
        // Send packet to decoder
        if (avcodec_send_packet(InputCodecContext, Packet) == 0)
        {
            // Receive decoded frame
            while (avcodec_receive_frame(InputCodecContext, DecodedFrame) == 0)
            {
                // DecodedFrame now contains BGRA data
                // Convert from BGRA to YUV420P
                sws_scale(SwsContext, DecodedFrame->data, DecodedFrame->linesize, 0, Height, OutputFrame->data, OutputFrame->linesize);

                OutputFrame->pts = FrameCount++;

                // Encode and write the converted frame
                if (avcodec_send_frame(CodecContext, OutputFrame) == 0)
                {
                    AVPacket* EncodedPacket = av_packet_alloc();
                    while (avcodec_receive_packet(CodecContext, EncodedPacket) == 0)
                    {
                        av_packet_rescale_ts(EncodedPacket, CodecContext->time_base, OutputStream->time_base);
                        EncodedPacket->stream_index = OutputStream->index;
                        av_interleaved_write_frame(OutputFormatContext, EncodedPacket);
                    }
                    av_packet_free(&EncodedPacket);
                }
            }
        }
        av_packet_unref(Packet);
    }
}
av_packet_free(&Packet);
av_frame_free(&DecodedFrame);
After we log a message indicating that the recording has started, the loop continues while the bIsRecording is set to true. The av_read_frame function reads a packet of data from the input stream and stores it in the packet. If the function returns a negative number, the loop skips processing of this packet.
The avcodec_send_packet function is then used to send the packet to the decoder, queuing it for decoding, and avcodec_receive_frame retrieves a decoded frame from the decoder. At this stage, the frame contains raw pixel data in the input pixel format.
The sws_scale function is used to convert the raw frame from the input format to the YUV420P format required for encoding. Input data from DecodedFrame is converted to output data in OutputFrame, with resolution and pixel format adjustments managed by SwsContext.
Next, the frame counter is incremented, and the value is assigned as the presentation timestamp of the OutputFrame, ensuring proper synchronization in the output file.
The avcodec_send_frame function sends the converted frame to the encoder, queuing it for encoding into a compressed format, while the avcodec_receive_packet function retrieves the encoded packets from the encoder.
The av_packet_rescale_ts function adjusts the timestamps of the packet from the encoder's time base to the output stream's time base. Finally, after the stream index is copied from the output stream, the encoded packet is written to the output file using the av_interleaved_write_frame function.
The av_packet_free is used to release the memory allocated for a packet.
Outside the main recording loop, meaning bIsRecording was set to false in the StopRecording method, which we yet need to implement, we need to flush the encoder's buffer to ensure that any remaining frames are processed and written to the output file.
if (avcodec_send_frame(CodecContext, nullptr) >= 0)
{
    AVPacket* FlushPacket = av_packet_alloc();
    while (avcodec_receive_packet(CodecContext, FlushPacket) >= 0)
    {
        av_packet_rescale_ts(FlushPacket, CodecContext->time_base, OutputStream->time_base);
        FlushPacket->stream_index = OutputStream->index;
        av_interleaved_write_frame(OutputFormatContext, FlushPacket);
        av_packet_unref(FlushPacket);
    }
    av_packet_free(&FlushPacket);
}
Passing nullptr to avcodec_send_frame signals the encoder to flush its internal buffers. This is done when there are no more frames to encode, but any pending frames need to be finalized.
Which brings us to the very end of the lambda and also the StartRecording function. Here, we free the memory allocated for various instances, finalize the output file with av_write_trailer, which writes the stream trailer and frees the private data, log a message indicating that the recording has stopped, and set bIsRecording back to false.
sws_freeContext(SwsContext);
av_frame_free(&OutputFrame);
av_write_trailer(OutputFormatContext);
avio_closep(&OutputFormatContext->pb);
avformat_free_context(OutputFormatContext);
avformat_close_input(&InputFormatContext);
avcodec_free_context(&CodecContext);
UE_LOG(LogScreenRecorder, Log, TEXT("Recording stopped"));
bIsRecording = false;
});
}
The StopRecording function is significantly simpler. It just stops the main recording loop that runs in a separate thread by setting bIsRecording to false. If bIsRecording is already false, the function logs a warning message and returns early.
void UScreenRecorder::StopRecording()
{
    if (!bIsRecording)
    {
        UE_LOG(LogScreenRecorder, Warning, TEXT("ScreenRecorder is not currently recording"));
        return;
    }

    bIsRecording = false;
}
And that's it! The entire ScreenRecorder class is now implemented and ready to be used by the subsystem.
Screen Recorder Subsystem
The ScreenRecorderSubsystem, a blueprint-type class derived from UGameInstanceSubsystem, will also have StartRecording and StopRecording functions. However, both will be very straightforward, as the subsystem simply wraps the ScreenRecorder. Here is the content of the ScreenRecorderSubsystem.h header file.
#pragma once

#include "CoreMinimal.h"
#include "Subsystems/GameInstanceSubsystem.h"
#include "ScreenRecorderSubsystem.generated.h"

class UScreenRecorder;
struct FScreenRecorderOptions;

UCLASS(BlueprintType)
class FFMPEGSUBSYSTEM_API UScreenRecorderSubsystem : public UGameInstanceSubsystem
{
    GENERATED_BODY()

public:
    UFUNCTION(BlueprintCallable)
    void StartRecording(const FScreenRecorderOptions& Options);

    UFUNCTION(BlueprintCallable)
    void StopRecording();

private:
    UPROPERTY()
    UScreenRecorder* ScreenRecorder;
};
And the content of the source file, ScreenRecorderSubsystem.cpp.
#include "ScreenRecorderSubsystem.h"
#include "ScreenRecorder.h"

void UScreenRecorderSubsystem::StartRecording(const FScreenRecorderOptions& Options)
{
    if (!ScreenRecorder)
    {
        ScreenRecorder = NewObject<UScreenRecorder>();
        ScreenRecorder->Initialize();
    }

    ScreenRecorder->StartRecording(Options);
}

void UScreenRecorderSubsystem::StopRecording()
{
    ScreenRecorder->StopRecording();
}
As you can see, nothing complicated is happening here. We use lazy initialization to create and initialize ScreenRecorder the first time StartRecording is called. Alternatively, instead of lazy initialization, you can override the Initialize function from the UGameInstanceSubsystem parent class and initialize ScreenRecorder over there.
Usage
Since the ScreenRecorderSubsystem is a blueprint-type class, it can be used in both C++ and Blueprints. The C++ usage might look like this.
UGameInstance* GameInstance = GetWorld()->GetGameInstance();
UScreenRecorderSubsystem* ScreenRecorderSubsystem = GameInstance->GetSubsystem<UScreenRecorderSubsystem>();

FScreenRecorderOptions Options;
Options.TargetWidth = 960;
Options.TargetHeight = 540;

ScreenRecorderSubsystem->StartRecording(Options);
//...
ScreenRecorderSubsystem->StopRecording();
While in Blueprints, the usage might look like this:
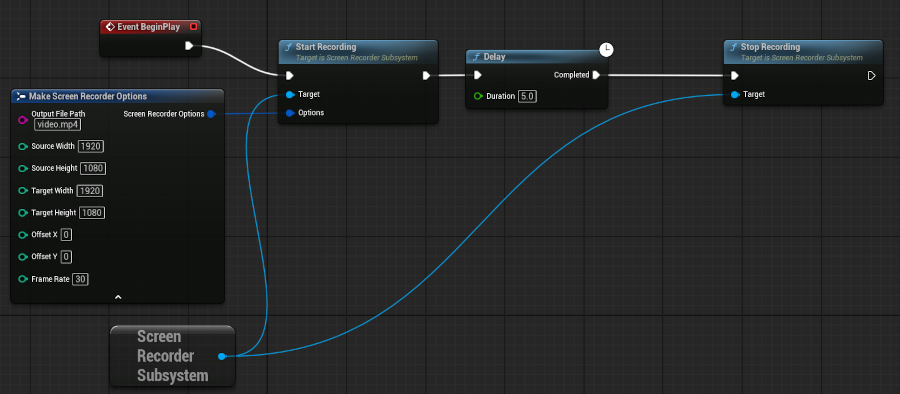
Conclusion
In the previous part, we've seen how to prepare a plugin in Unreal Engine that serves as a wrapper around third-party libraries. We covered the modular build system of Unreal Engine and saw how to properly link FFmpeg libraries. In today's part, we used these libraries to implement a screen recorder class with a convenient API, wrapped in a game instance subsystem, allowing it to be used in both C++ and Blueprints. I hope you found these posts valuable, and thank you for reading.
Enjoyed this article? Support my work ❤️
All content on this blog, which I've already put hundreds of hours into, is and always will be free.
No ads. No paywalls. No tricks.
I've personally paid for a lot of educational content, but I strongly believe knowledge should be accessible to everyone.
I also pay to keep this blog up and running, and if you like what I do here, if it has helped you, and you would like to support me, you can

Even a small contribution, the price of a coffee, is very much appreciated.
Other Parts of This Series
- FFmpeg Subsystem for Screen Recording in Unreal Engine, Part I
- FFmpeg Subsystem for Screen Recording in Unreal Engine, Part II


